BEHRINGER CMD-STUDIO 2a

SETUP
Step 1. Connections
Connect the CMD Studio 2a to a USB port of your computer using the provided USB cable. Connect a pair of amplified speakers to the Master Output at the rear panel of the unit and your Headphones at the front socket.
Step 2. Drivers
Windows : Download and install the Behringer Studio2a ASIO drivers from https://www.behringer.com/Categories/Behringer/Computer-Audio/DJ-Controllers/CMD-STUDIO-2A/p/P0AVW/Downloads
Mac OSX : No drivers is required to be installed for Mac OSX computers.
Step 3. VirtualDJ
Install VirtualDJ 8 from http://www.virtualdj.com/download/index.html (in case you have not done already)
Start VirtualDJ and login with your Account credentials. A Pro Infinity, Pro Subscription or Plus Behringer CMD Studio 2a Controller License is required.
Find a detailed installation procedure at http://www.virtualdj.com/manuals/virtualdj8/quickstart.html
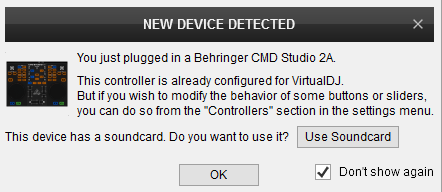
A detection window will appear when the unit is first connected with VirtualDJ, verifying proper connection
Click on the Use Soundcard button in order VirtualDJ to apply the pre-defined audio configuration using the built-in sound-card of the unit. Speakers need to be connected to the rear panel of the unit in this case.
Click to OK

The unit is now ready to operate with VirtualDJ.
CONTROLS

KEY
ACTION
When the MODE button is pressed, jowheels are set to Search (Seek) mode for fast searching track in time
In Loop mode :
MINUS : Sets a Loop In (Start) point for a manual loop
PLUS : Sets a Loop Out (End) point for a manual loop. Exits Loop when enabled
In Effect mode :
MINUS : Selects the next available Effect
PLUS. Activates the selected Effect
In Loop mode : Doubles/halves the size of the Loop. when the MODE button is pressed, moves the triggered loop backwards/forward by 1 beat.
In Effects mode : Adjusts the 1st Parameter of the selected Effect. When the MODE button is pressed, adjust the 2nd Parameter of the selected Effect
ASSIGN B : Sets PITCH BEND and PITCH keys to Effects mode when enabled.
When both are disabled, the PITCH BEND and PITCH keys are set to Tempo mode (default mode)
When MODE button is pressed, the buttons stop the triggered Sample
When the fader is at the far left position, only Left Deck will be sent to the Master Output.
When the fader is at the far right position, only Right Deck will be sent to the Master Output.
When MODE button is pressed, selects the new view of the Sideview
When the MODE button is pressed, sets focus to the Sideview of the Browser
When the MODE button is pressed, unloads the same Deck
Note : The unit offers the ability to select a different MIDI Channel and in order to ensure proper functionality, VirtualDJ forces MIDI Channel 4 for this unit on initialization. If you find that some other application doesn't work properly after VirtualDJ is used, follow this procedure to reset the unit to its primary MIDI Channel.
- While holding left CUE and left PLAY buttons simultaneously, plug the USB cable to the unit,
- When these buttons blink (after a couple of seconds), release the CUE and PLAY buttons.
