GEMINI G4V


for VirtualDJ 8.2+
Last Update : August 2016
 

SETUP


Firmware & Drivers


Please visit Gemini G4V product page to download and install the latest drivers and firmware depending on your OS.

VirtualDJ 8 Setup


Download and install VirtualDJ 8 from our Downloads Page
(in case you have not done already)

Once VirtualDJ 8 is launched, a Login Window will appear. Login with your virtualdj.com account credentials. A Pro Infinity, a Gemini G4V Plus or a Pro Subscription License is required to fully use the Gemini G4V

Without any of the above Licenses, the controller will operate for 10 minutes each time you restart VirtualDJ.
Buy a license


A detection window will appear next verifying proper connection with Gemini G4V.

Click on the "Use Soundcard" button in order VirtualDJ to apply the pre-defined audio configuration (speakers need to be connected to the rear side of the unit in this case).

Click to OK


The unit is now ready to operate.


Advanced Setup


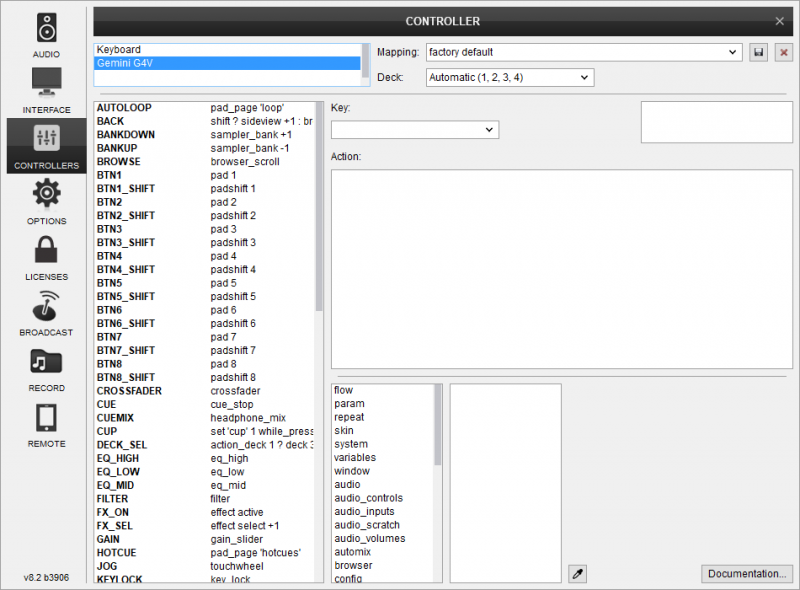
MIDI Operation
The unit should be visible in the CONTROLLERS tab of Config and the “factory default” available/selected from the Mappings drop-down list. The factory default Mapping offers the functions described in this Manual, however those can be adjusted to your needs via VDJ Script actions.

Find more details at
VDJ Pedia

AUDIO Setup
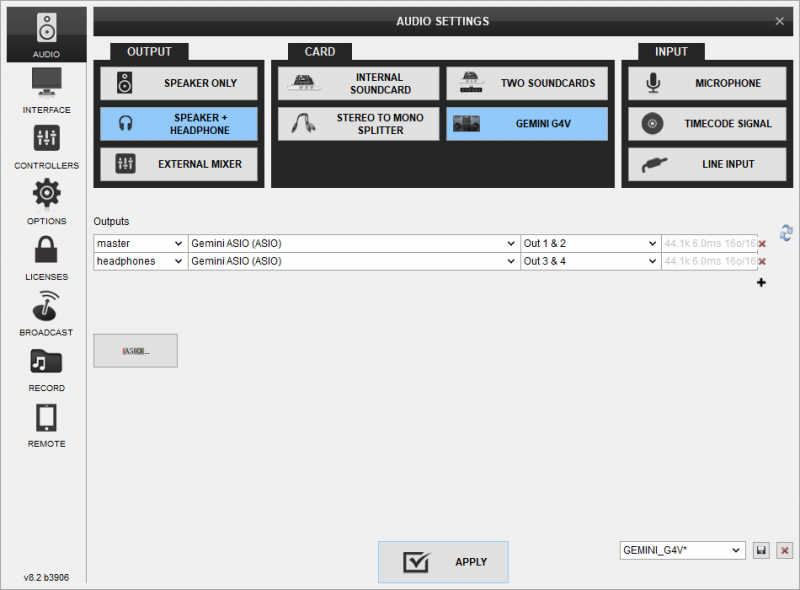

The unit has a pre-defined Audio setup and a special button in the AUDIO tab of Config to provide that. Alternative Audio setups can be applied in the same window.


For further software settings please refer to the Manuals of VirtualDJ 8.
 

CONTROLS


KEY

ACTION

SHIFT (SECONDARY) ACTION

S SHIFT
Hold this button down to access secondary actions as described in the SHIFT ACTION column.
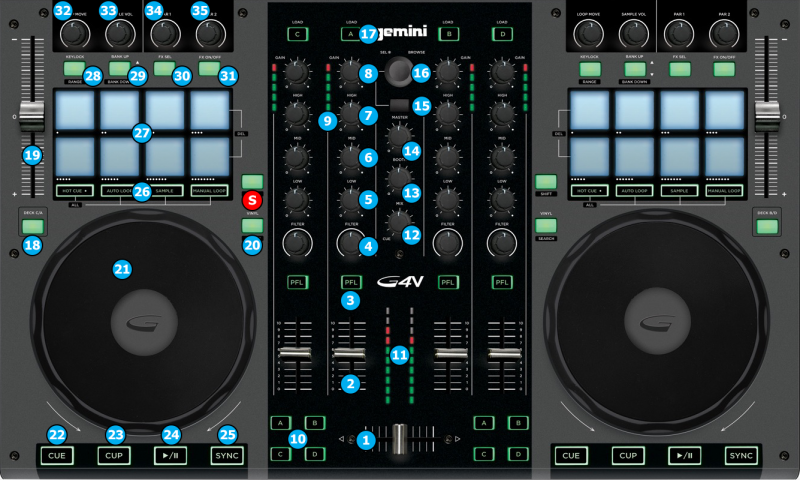
1 CROSSFADER
Blends audio between the channels assigned to the left and right side of the crossfader
2 VOLUME
Adjust the Volume of each channel.
3 CUE (PFL)
Send each channel to the Headphones Output channel
4 FILTER
Apply a lowpass to highpass resonance filter effect on each channel's sound. Middle position (12 o clock) deactivates the filter effect
5 EQ LOW
Adjust the low frequencies for each mixer channel
6 EQ MID
Adjust the mid frequencies for each mixer channel
7 EQ HI
Adjust the high frequencies for each mixer channel
8 GAIN
Adjust the Gain of each mixer channel. Note that the "zero gain / park" position is 12 o clock.
9 CH INPUT VUMETER
Shows each channels input (pre fader) volume
10 CROSSFADER CH ASSIGN
Define if a mixer channel will be output regardless of the position of the crossfader (All buttons OFF) or it's Left/Right side (Buttons ON)
11 MASTER OUTPUT VUMETER
Shows the master output volume of the unit
12 HEADPHONES MIXING
Adjust how the Channels and the Master Output blend at the Headphones Channel
13 BOOTH MONITOR
Adjust the level of the Booth Output
14 MASTER VOLUME
Adjust the level of the Master Output
15 BACK
Cycles focus between Folders, Songs and the Sideview
Cycles through the available views of Sideview (Automix, Sidelist, Sampler, Karaoke and Clone views)
16 BROWSE
Scrolls through files or folders
17 LOAD
Load the selected track on the corresponding deck
Unload the deck
18 DECK SELECT
Switch Left decks (1 and 3) and Right Decks (2 and 4)
19 PITCH
Controls the track's playback tempo
20 VINYL MODE
Toggle the JOGWHEEL between Scratch and Pitch Bend modes
Toggle the JOGWHEEL between "Search" mode (to seek position inside the track) and normal operation.
21 JOGWHEEL
Touch sensitive platter for scratching (vinyl mode), bending (CD Mode) or Seeking
22 CUE
When the Deck is paused, you can set a temporary Cue Point by moving the Platter to place the Audio Pointer at the desired location and then pressing the Cue Button. During playback, you can press the Cue Button to return the track to this Cue Point. (If you did not set a Cue Point, then it will return to the beginning of the track.). If the Deck is paused, you can press and hold the Cue Button to play the track from the Temporary Cue Point. Releasing the Cue Button will return the track to the temporary Cue Point and pause it. To continue playback without returning to the Temporary Cue Point, press and hold the Cue Button, then press and hold the Play Button, and then release both buttons
23 CUP
Stops the deck while held down, and starts the playback once released
24 PLAY/PAUSE
Plays / Pauses the track
25 SYNC
Automatically match the corresponding Deck's tempo with the opposite Deck's
26 PAD MODES
27 PADS
28 KEYLOCK
Locks the track's pitch to the current key
Cycle through the available pitch range values
29 SAMPLER BANK SELECT
Select the next Sampler Bank
Select the previous Sampler Bank
30 FX SELECT
Select the next available effect
31 FX ON
Select the next available effect
32 LOOP MOVE
Moves the loop
33 SAMPLER VOLUME
Adjusts the volume of the sampler
34 FX PARAMETER 1
Controls the 1st parameter of the selected effect
35 FX PARAMETER 2
Controls the 2nd parameter of the selected effect


For further Technical features and specifications, visit

GEMINI G4V
Product's Page


Hardware Integration Department
2016 - ATOMIX PRODUCTIONS