PIONEER DDJ-FLX10
SETUP
Firmware & Drivers
Firmware: Update the firmware of the device to the latest available version from
https://www.pioneerdj.com/en/support/software/controller/ddj-flx10/
Drivers For both Windows and Mac OS, install the necessary drivers from https://www.pioneerdj.com/en/support/software/controller/ddj-flx10/
VirtualDJ Setup
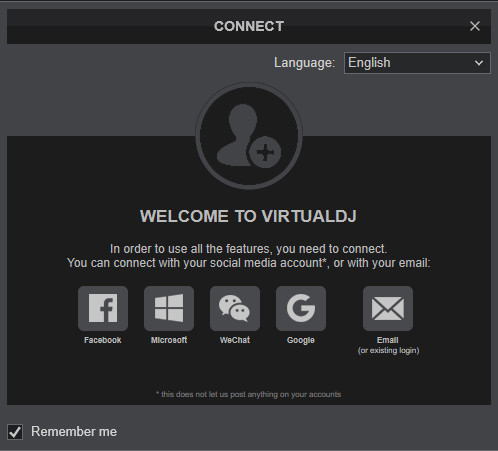
Once VirtualDJ is opened, a Connect Window will appear. Login with your virtualdj.com account.
A Pro Infinity or a Pro Subscribtion is required to fully use the Pioneer DDJ-FLX10. Without any of the above Licenses, the controller will operate for 10 minutes each time you restart VirtualDJ.
https://www.virtualdj.com/buy/index.html
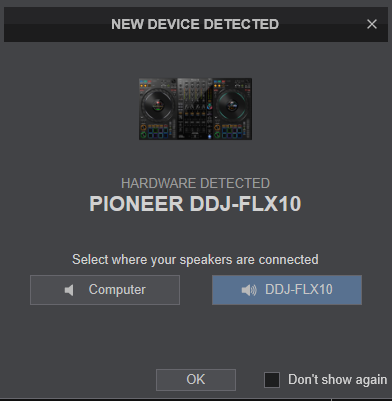
Click on the "DDJ-FLX10" button if speakers are connected to the Master Output of the DDJ-FLX10. You can still change that from Settings->AUDIO tab.
Click to OK.
MIDI Operation
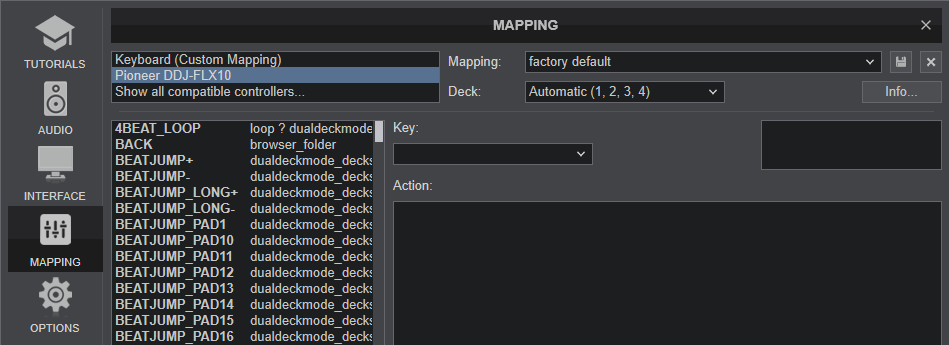
The device should be visible in the MAPPING tab of Config and the “factory default” available/selected from the Mappings drop-down list. The factory default Mapping offers the functions described in this Manual, however those can be adjusted to your needs via VDJ Script actions.
Find more details at https://www.virtualdj.com/wiki/VDJ8script.html
AUDIO Setup
The device has a pre-defined Audio setup and a special button in the AUDIO tab of Config to provide that.

Please read the manual of DDJ-FLX10 for further functionality https://www.pioneerdj.com/en/support/documents/controller/ddj-flx10/
For further software settings please refer to the User Guides of VirtualDJ. https://www.virtualdj.com/manuals/virtualdj/index.html
LAYOUT

S SHIFT Press and hold this button to access secondary functions of other controls on the DDJ-FLX10
The functionality of each button, knob and connection per section (as shown in the image above) will be explained in detail in the next chapters
A. Mixer Controls
B. Deck Controls
C. Performance Pads
D. Front & Rear Panel
MIXER & EFFECT CONTROLS
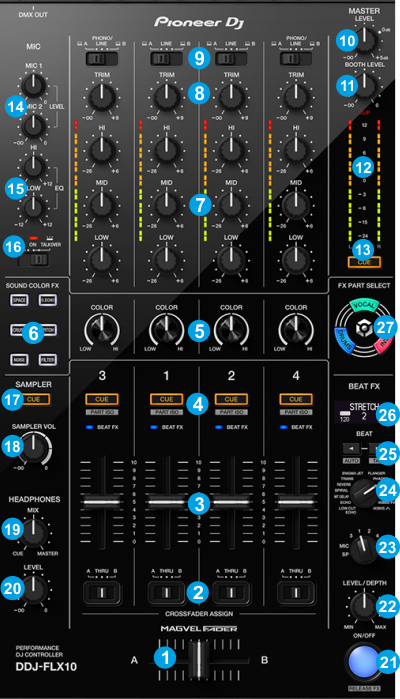
MIXER CONTROLS
- CROSSFADER. Blends audio between the channels assigned to the left and right side of the crossfader.
- CROSSFADER CH ASSIGN. Define if a mixer channel will be output regardless of the position of the crossfader (THRU position) or Left/Right.
- VOLUME. Adjust the Volume of each channel.
- CUE (PFL) (per channel) Press these buttons to send each channel to the Headphones Output channel.
- COLOR FX PARAMETER. Adjust the parameter of the selected COLOR FX for each channel. When in middle position, the COLOR FX has no effect on the sound.
- SOUND COLOR FX. Select one of the predefined Color Effects (Dub Echo, Space (Flanger), Crush (Distortion), Pitch, Noise and Filter).
- 3-BAND EQ. Adjust the Low/Mid/High frequencies (or the assigned Stems channel) for each mixer channel. See EQ Mode
- TRIM. Adjust the Gain of each mixer channel.
- SOURCE SELECTORS. Define the source of each Channel. Put the switchers to USB A or USB B position for software mixing.
- MASTER VOLUME. Adjust the level of the Master Output.
- BOOTH MONITOR. Adjust the level of the Booth Output of the DDJ-FLX10.
- MASTER OUTPUT VUMETER. Shows the master output volume of the unit.
- MASTER CUE (PFL). Send the Master Output of the unit to the Headphones Output channel. Please note that in order to hear the Master Output on your headphones you must also turn the HEADPHONES MIXING (19) knob to the desired position.
- MIC 1/2 VOLUME. Adjust the Volume Level of MIC/MIC2 Inputs of the DDJ-FLX10
(Hardware operation - Knobs don't send any MIDI message, therefore cannot be assigned to any action) - MIC HI/LOW EQ. Adjust the High/Low frequencies of both MIC1 and MIC2 Inputs of the DDJ-FLX10
(Hardware operation - Knobs send MIDI message and can be assigned to a VDJ script action, however the hardware operation will be still applied.) - MIC CONTROL. Turn ON and OFF the MIC1 and MIC2 Inputs of the DDJ-FLX10 or enable the auto Talk Over.
- SAMPLER PFL. Send the sound of VirtualDJ Sampler to the Headphones Output channel.
- SAMPLER VOLUME. Adjust the Master Output Volume of the VirtualDJ Sampler
- HEADPHONES MIXING. Adjust how the Channels and the Master Output will blend at the Headphones Channel.
- HEADPHONES VOLUME. Adjust the volume of the Headphones Channel.
EFFECT CONTROLS
The BEAT FX section is used to apply VirtualDJ effects to Decks 1 to 4, Master or Sampler and Hardware Effects on the Microphone Inputs.
- BEAT FX ON: Use this button to enable/disable the selected Beat FX. Its led will flash when enabled
- BEAT FX LEVEL: Use this knob to adjust the 1st Parameter of the selected Effect (usually the Wet/Dry).
- BEAT FX ASSIGN: Use this selector knob to select to which Channel the effect will apply to. (Decks 1 to 4, Master, Microphone or Sampler). The selected channel will be displayed on the LCD screen.
- BEAT FX SELECT: Use this selector knob to select one of the pre-defined Beat FX. The name of the selected Effect is displayed on the LCD screen.
- BEAT: Use these buttons to half/double the Beats Parameter of the selected Effect (for the Effects that are beat-aware). The beats value is displayed on the LCD screen.
- BEAT FX LCD SCREEN: Shows information about the selected effect.
- BEAT FX PART SELECT: Select a Stems channel for the selected Effect to be applied to. When all 3 buttons are lit, the Effect will be applied to all Stems channels. Note that these buttons will have no effect when the Beat FX is assigned to Master, Sampler or Microphone and the Effect will apply to the full audio signal
DECK CONTROLS

S SHIFT. Press and hold this button to access secondary functions (black lettering in gray box) of other controls on the DDJ-FLX10
- PLAY/PAUSE. Plays / Pauses the track. Press and hold SHIFT and then press this button to "stutter-play" the track from the last set Cue Point.
- CUE. When the Deck is paused, you can set a temporary Cue Point by moving the Platter to place the Audio Pointer at the desired location and then pressing the Cue Button. During playback, you can press the Cue Button to return the track to this Cue Point. (If you did not set a Cue Point, then it will return to the beginning of the track.). If the Deck is paused, you can press and hold the Cue Button to play the track from the Temporary Cue Point. Releasing the Cue Button will return the track to the temporary Cue Point and pause it. To continue playback without returning to the Temporary Cue Point, press and hold the Cue Button, then press and hold the Play Button, and then release both buttons.
Hold down SHIFT and then press this button to return to the beginning of the track. - BEAT JUMP: Use these buttons to move track backwards/forward by 4 beats. Keep the buttons pushed for continuous seeking. Hold down SHIFT and use these buttons to move track backwards/forward by 16 beats.
- DECK SELECT. Switch Left decks (1 and 3) and Right Decks (2 and 4). The number of the selected Left/Right Deck will be displayed on the Jog screen.
Hold SHIFT down and then press this button to enable/disable Dual Deck mode on Left or Right side. When enabled (Jog screen will show both Deck numbers active), several controls, such as Jogwheel, Play, Cue, Loops, Pads etc will apply to both Decks of the same side. - SLIP REVERSE. Press and hold this button to play the track backwards. On release the track will continue playing from the position it would have been if the button was never pressed. Hold SHIFT down and press this button (momentarily) to play the track backwards. Press again to return to forward direction.
- LOOP IN. When not in loop, use this button to set a Loop In point (for manual looping). When in loop, use this button to halve the size (in beats) of the current loop
When in Loop, hold SHIFT down and press this button and then use the Jogwheel to fine-adjust the Loop In point (and the size of the current loop) - LOOP OUT. When not in loop, use this button to set the Loop Out point (for manual looping). When in loop, use this button to double the size (in beats) of the current loop
When in Loop, hold SHIFT down and press this button and then use the Jogwheel to fine-adjust the Loop Out point (and the size of the current loop) - 4 BEAT LOOP. Use this button to activate a seamless 4 beats loop. If a loop is active use this button to exit the loop.
Hold down SHIFT and press this button to activate the last triggered Loop (re-loop) - ACTIVE PART. Use these buttons to select which Stem channel (Drums, Vocals, Instruments) of the Track will be audible. When turned off, the respective Stem channel will be muted. These buttons can operate in 2 ways. See Advanced Settings
Hold SHIFT down and then double-press one of these buttons to perform Stems Split. When performed on a Deck :
- The Track of the other Deck will be cloned to the current one.
- The Stem channel of your selection will be muted to the other Deck.
- The current Deck will have the other 2 Stems muted.
Note : make sure the Volumes and EQ knobs are identical on the 2 Mixer channels, to avoid unwanted audio difference.
The Stems split/clone functionality can performed between different side Decks (Left/Right) or same side-Decks (1 and 3 or 2 and 4), depending on the StemsSplitLeftRight setting (from VirtualDJ Settings->OPTIONS tab) - CUE CALL. Use these buttons to jump to the previous/next available Cue point of the Track.
- MIXPOINT SELECT. Use these buttons to adjust the Key of the Track by 1 semitone
- LINK. Use this button to reset the Key of the Track to its original value.
- BROWSE.
Turn: Scrolls through files or folders. Hold SHIFT down and turn the encoder for fast scrolling
Push: If focus is on the Folders list push the encoder to set focus on the Songs list. If focus is on the Songs list, push once to load the selected track on the deck, or press twice (double-click) to clone the track from the other deck to this deck.
Hold down SHIFT and press the knob down to display the VirtualDJ Browser in zoom state. - BACK. Press this button to set focus to the Folders list. If focus is on Folders list, use this button to expand/collapse sub-folders.
Hold down SHIFT and press this button to add the selected track on the current playlist. - VIEW.. Press this button to toggle focus between the Songs list and the Sideview list.
Hold down this button for one second to show/hide the track info panel.
Hold down SHIFT and press this button to cycle though the available Sideview lists (Automix, Sidelist, Karaoke, Sampler and Clone) - QUANTIZE. Press this button to toggle Quantize on/off. When Quantize is enabled, setting loops, jumping between hot cue points and starting playback of the deck will snap to the grid (CBG) of the track.
Hold SHIFT down and then tap this button on-beat while Deck is playing to manually set the Beat-Grid (if incorrectly calculated) or press once while Track is paused to set current position as the 1st Beat-Anchor - SLIP. Enables Slip Mode. Several software functions (such as Jogwheel movements, HotCues and Loops) will apply temporary on the track, and the track will return to the position it would have been if those functions were not triggered. Hold down SHIFT and press this button to toggle between the Scratch and Bend Jogwheel modes.
- JOG FEELING ADJUST. Adjust the tension of the Jogwheel (hardware operation)
- JOGWHEEL. Pressure sensitive platter for scratching (Vinyl Mode) , bending (CD Mode) or Loop In/Out fine-adjust.
Hold SHIFT down and then use the Jogwheel to fast-seek through the Track.
An alternative SHIFT functionality is available for the Jogwheel. See Controller Settings. When the Setting JogShiftaction is set to Beatgrid, the jogwheel will perform Beat-Grid Width adjust (BPM) when rotating the Jogwheel while touched on the top surface and Beat-Grid Slide when rotating without touching the top surface (outer platter). - TEMPO. Controls the track's playback tempo.
- BEAT SYNC. Press this button to automatically match the corresponding Deck's tempo with the opposite Deck's (or the Master Deck’s if using a 4 decks Skin) tempo and phase. Hold this button down for more than 1 second to enable/disable Beat-Lock. When enabled (led will blink), the Decks are kept synchronized even when moving the Pitch, scratching etc.
Hold down SHIFT and press this button to manually set the Deck as Master Deck and force the other Decks to synchronize with it. - TEMPO RESET. Press this button to reset the Track's tempo to its original value. The led of this button will blink while resetting and will be turned on when Tempo is at zero position.
Hold SHIFT down and then press this button to select the next % range for the Pitch fader (cycle through 6, 10, 15 and 100%) - KEY SYNC. Press this button to match the musical Key of the track with the Key of the Master deck (or the other deck if using a 2 decks skin). The change of the Key will be the smallest required to make it compatible with the other Key. Press again to reset Track's key to its original value.
Hold down SHIFT and press this button to "lock" the track's pitch to its original key. The track's tempo will remain at the speed designated by the Pitch Fader.
ON JOG DISPLAY
The DDJ-FLX10 offers On-Jog screens with various Deck information depending on the selected view. Hold SHIFT down and then use the PAGE buttons to select the previous/next available screen view.

In Deck Info view, the screen displays the Deck number, a small Artwork, a Stems-Ready icon, Key value and Key difference, Master Tempo status (MT) , BPM, Pitch (Tempo) value and % range, a Track progress waveform, a progress Beat-grid line, Time (Elapsed or Remain), Slip mode indicator, Master Deck and Sync status.
In Waveform view, the screen displays all the info of the Deck view but Track progress waveform and Beat-grid line are replaced with the detailed Track's Scratch-Wave along with the Scratch-wave of the opposite Deck.
In Artwork Display view, the screen displays a large Artwork of the Deck's Track.
In DJ Logo view, the screen displays a customized image, which can be loaded to the device from the DDJ-FLX10 Utilities (from \Programs\Pioneer\DDJ-FLX10 )
In all the available views, a rotation marker is displayed, and can be turned On/Off by double-pressing the SHIFT button.
Note: If the Jog Display is not opened and/or displays NO AUDIO DRIVER, then the necessary Windows/Mac driver was not properly installed.
An additional temporary view is available for the Jog Displays with information about the assigned functionality of the Pads. This view will be displays as long as any of the PAGE button is held down.
PERFORMANCE PADS
The 8 RGB Performance Pads offer various functions, depending on the selected mode. Each of the 4 Pad mode buttons offers 2 individual modes. One with the press of the mode button, and an additional mode with press of the mode button while SHIFT is held down. The 8 modes represent a page of the PADS section on the default VirtualDJ GUI, have been pre-assigned but can be customized https://www.virtualdj.com/manuals/virtualdj/interface/decks/decksadvanced/pads.html#controller
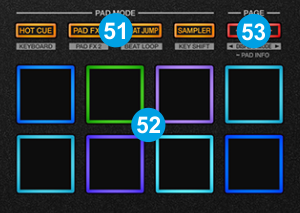
- PAD MODE. Press any of the 4 available Pad mode buttons to set the Pads to Hotcues, Pads FX, Beatjump and Sampler mode.
Hold SHIFT down and then press any of the 4 available Pad mode buttons to set the Pads to Keycue, Loop Roll, Loop and Slicer mode. (led will blink)
While holding one of the 4 Pad mode buttons, you can press a second Pad mode button and split the functionality of the Pads (top/bottom) between 2 modes. Read further info at https://www.virtualdj.com/manuals/virtualdj/interface/decks/decksadvanced/pads.html#split - PADS. The 8 RGB-lit Pads offer different functionality depending on the selected mode.
- PAGE. Increase/decrease the Parameter (if available) of the selected Pads page .
Hold SHIFT and then use these buttons to cycle through the available On-Jog screen views.
Hold any of these 2 buttons down for more than one second to get information regarding the Pads functions on the Jog Screen.
PADS FX PAGE
This Pads page will be available only when the DDJ-FLX10 is connected and offers the following functionality
Pads 1 to 4 trigger a different BeatGrid Effect pattern.
Pad 5 applies an Echo FX on The Vocals Stem of the Track.
Pad 6 applies a Reverb FX on the Vocals Stem of the Track.
Pad 7 apples a BeatGrid FX on the Instrumentals Stem of the Track
Pad 8 apples an Echo FX on the Instrumentals Stem of the Track
FRONT & REAR PANELS


- MASTER OUT1: Master signal output connectors (XLR – Balanced). Use this to connect on your pro grade amplifier or self-powered speakers.
- MASTER OUT2: Master signal output connectors (RCA – Unbalanced). Use it to connect with another mixer, or consumer grade amplifier.
- BOOTH OUT: Booth signal output (TRS – Balanced). The strength of the signal is controlled by “BOOTH MONITOR LEVEL” knob (14) on the mixer section. Use it to connect your booth speakers, or an amp that needs different sound output level than master output.
- CH4 INPUTS: Connect an analog source on CH4 of the DDJ-FLX10 mixer. You can connect a turntable or a CD-Player. The input is selectable via the LINE/PHONO switcher
- CH2 INPUT: Connect an analog source on CH2 of DDJ-FLX10 Mixer. You can only connect a CD-Player, or a similar line level device.
- CH1 INPUT: Connect an analog source on CH1 of DDJ-FLX10 Mixer. You can only connect a CD-Player, or a similar line level device.
- CH3 INPUTS: Connect an analog source on CH3 of the DDJ-FLX10 mixer. You can connect a turntable or a CD-Player. The input is selectable via the LINE/PHONO switcher
- DMX OUT: This output is not used by VirtualDJ
- USB: Use a standard USB-C cable to connect DDJ-FLX10 with your computer. Select USB A or USB B from the top panel Source selectors to control VirtualDJ Decks.
- MIC 2 INPUT: Connect a mic on the DDJ-FLX10 mixer. You can use only a Jack (TRS) connector.
- MIC 1 INPUT: Connect a mic on the DDJ-FLX10 mixer. You can use XLR or Jack (TRS) connectors.
- POWER SWITCH: Turns on/off the power on the device. Please turn on the device only after doing and securing all connections on the back.
- DC INPUT: Connect the supplied PSU.
- HEADPHONES CONNECTOR: Connect your headphones. Both sizes (3.5mm and 6.35mm ( 1⁄4 in)) are offered.
ADVANCED SETUP
Pioneer DDJ-FLX10 offers a variety of Inputs and Operation modes. The unit can operate both as MIDI and a stand-alone hardware mixer at the same time, allowing mixing from analogue media sources (CD Players, Turntables etc) connected to one of the 4 available inputs at the rear panel, along with the ability to use a Computer DJ Application.
MIXER CHANNELS
Channel 3 (far left) :
Audio signal from an analogue source (such as a standard CD Player or Turntable) connected to the CH 3 inputs at the rear panel can be inserted and processed by the mixer when the switcher at the top panel is set to Phono/Line position.
When using the CH3 inputs, please make sure that you set the corresponding switcher on the rear of the device to the proper position (line/phono) depending on the type of the connected audio equipment.
Audio signal from VirtualDJ Deck 3 can be routed to this Channel when the switcher at the top panel is set to USB A or USB B position (depending on which USB port your computer is connected to)
Channel 1 (middle-left) :
Audio signal from an analogue line level source (such as a standard CD Player) connected to the CH 1 LINE inputs at the rear panel can be inserted and processed by the mixer when the switcher at the top panel is set to Line position.
Audio signal from VirtualDJ Deck 1 can be routed to this Channel when the switcher at the top panel is set to USB A or USB B position (depending on which USB port your computer is connected to)
Channel 2 (middle-right) :
Audio signal from an analogue line level source (such as a standard CD Player) connected to the CH 2 LINE inputs at the rear panel can be inserted and processed by the mixer when the switcher at the top panel is set to Line position.
Audio signal from VirtualDJ Deck 2 can be routed to this Channel when the switcher at the top panel is set to USB A or USB B position (depending on which USB port your computer is connected to)
Channel 4 (far right) :
Audio signal from an analogue source (such as a standard CD Player or Turntable) connected to the CH 4 inputs at the rear panel can be inserted and processed by the mixer when the switcher at the top panel is set to Phono/Line position.
When using the CH4 inputs, please make sure that you set the corresponding switcher on the rear of the device to the proper position (line/phono) depending on the type of the connected audio equipment.
Audio signal from VirtualDJ Deck 4 can be routed to this Channel when the switcher at the top panel is set to USB A or USB B position (depending on which USB port your computer is connected to)
Notes :
- Each time a different source is selected from the top switchers, the audio signal of other sources on the same channel will be muted.
- Switch between various sources is smooth, providing the ability of back-to-back dj changeover.
Recording & Broadcasting
The unit offers the ability to record the Master Output along with the Microphone and LINE Inputs directly from VirtualDJ record button (in the MASTER center panel). The dedicated Recording input channel is already pre-configured, so no further adjustments need to be done.
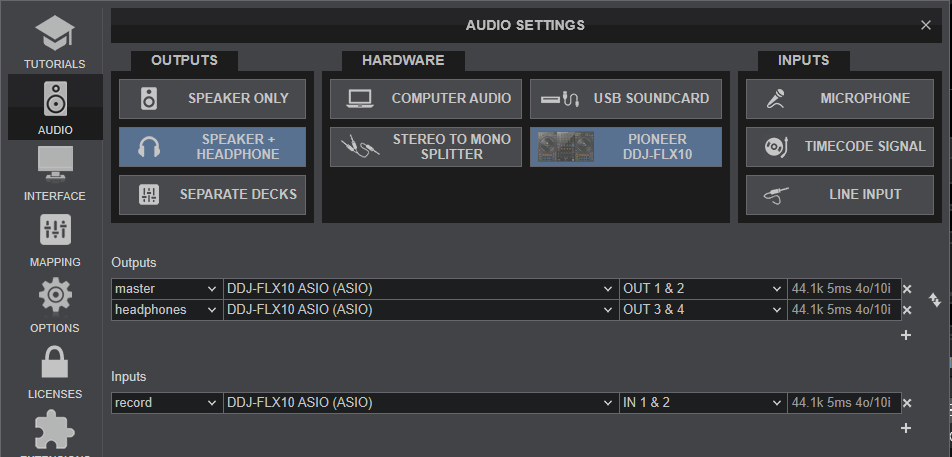
The recorded output includes any source routed to the Mixer, including analogue media sources connected to the LINE or PHONO Inputs when the top switchers are set to the relative position.
Note : If the signal of the Microphone inputs is not recorded, make sure the Controller setting PIFLX10-micRecord is enabled (see Controller Settings)
Timecodes (DVS)
DDJ-FLX10 offers DVS (Timecoded CDs and Vinyls) Support.
Depending on whether you use Timecode Vinyl (Turntables) or Timecode CDs (CD Players) please perform the following steps:
- Connect your Turntables to CH 3 and/or CH 4. If you use CD Players connect them to any of the available CH inputs Inputs.
- Place the Input switches on the top panel to USB A or USB B position for the related Mixer Channels (depending on which USB port your computer is connected to)
- Open VirtualDJ Settings ->AUDIO tab and press the TIMECODE SIGNAL button from the INPUT tab
- Click to APPLY
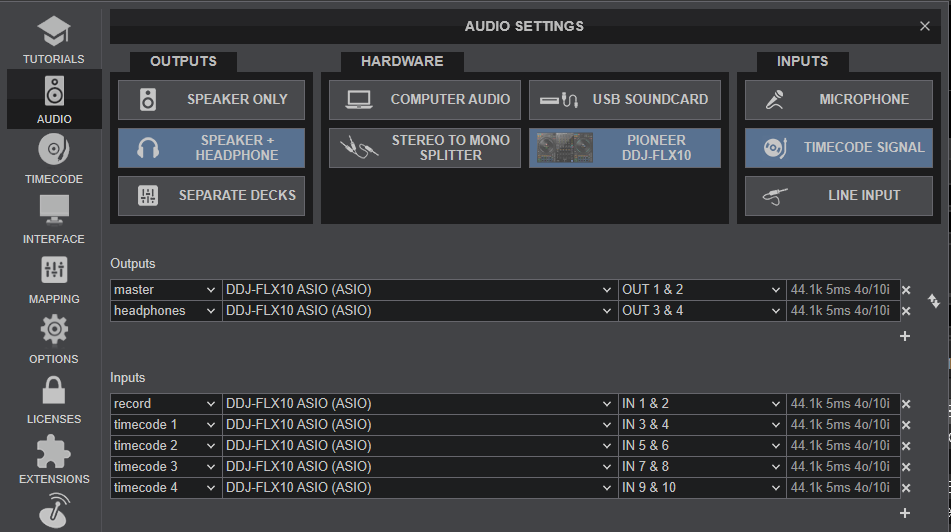
Use the TIMECODE On/Off buttons that will be offered on the Decks to enable/disable Timecode control or use the Timecode signal to control a different Deck (e.g. swap Timecode control for Left decks when the 4 Decks GUI is selected)
By default you would use Timecode Vinyls to control decks 3 & 4 and Timecode CD's to control deck 1 & 2
If you want to use Timecode Vinyls to control decks 1 & 2 instead then you should create the following audio setup:
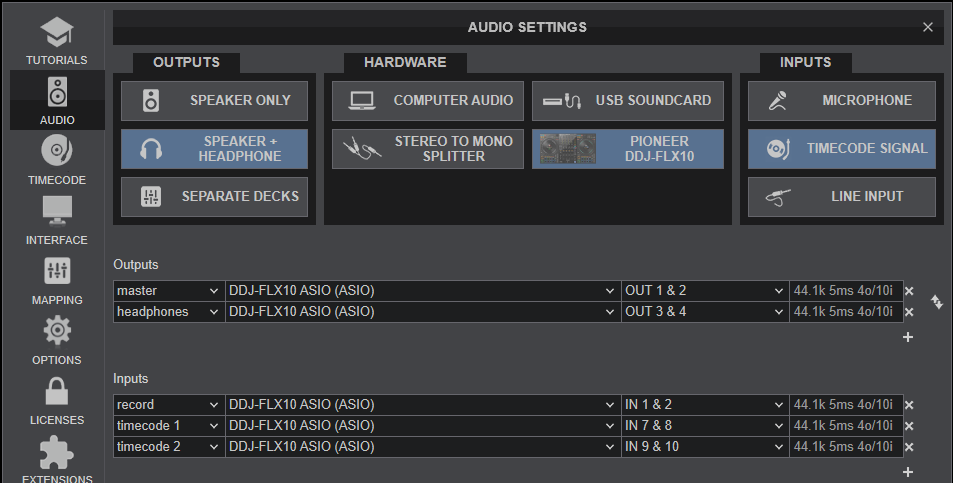
With this setup all the Input switchers on top of the mixer should be set on the same USB port that your computer is connect to.
LINE INS
The LINE Inputs can be also used to send audio signal from an analogue media source connected at the rear panel to VirtualDJ for processing.
- Connect your analogue media devices to one of the available LINE inputs. If you connect a source on Line 3 and/or Line 4 input, remember to switch the Line/Phono switcher to Line position for that channel(s)
- Place the Input switches on the top panel to USB A or USB B position on your mixer channels depending on with port your computer is connected at.
- Open VirtualDJ Settings ->AUDIO tab and press the LINE INPUT button from the INPUT tab
- Click to APPLY
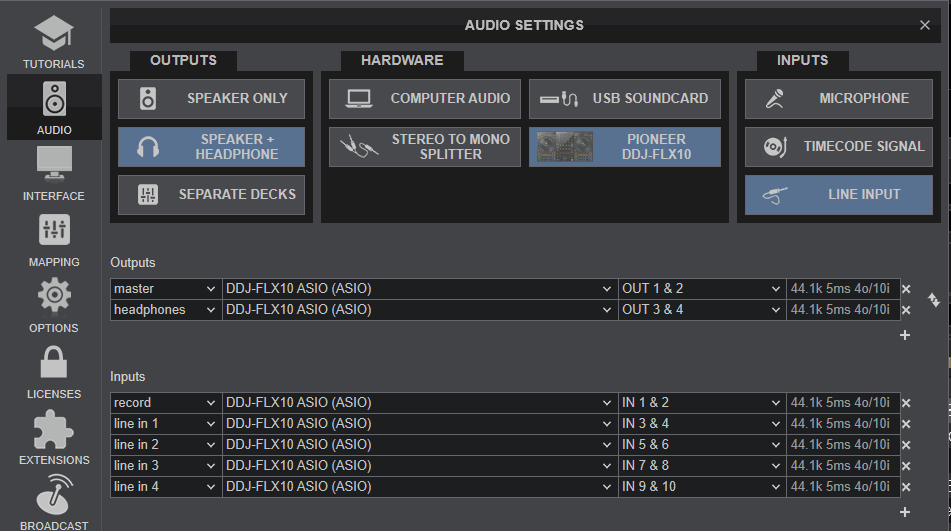
Use the LINE IN On/Off buttons that will be offered on the Decks to enable/disable Line In routing to a VirtualDJ deck.
This will provide the ability to synchronize BPM with other decks, use Effects etc.
MICROPHONE INPUTS
DDJ-FLX10 offers 2 Microphone Inputs and Level/EQ controls from the top panel. Both audio signals from these inputs are directly routed to the Master Output of the unit.
The Microphone inputs are not part of the USB Audio interface, so these cannot be added in VirtualDJ Audio setup and will not control the software Microphone section in the MASTER panel of VirtualDJ GUI and vice versa.
However, as mentioned in the Recording section, both Microphone Inputs can be recorded via the REC button of VirtualDJ via the dedicated recording input channel of the Audio interface.
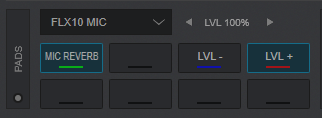
A Reverb Hardware Effect is available to apply to the Microphone Inputs.
To access control to this Fx, hold down the HOTCUE mode button (on any of the Decks) to get the FLX10 MIC page on Pads (or select it from the GUI) and then use the Pads to turn the Reverb FX on Mic on/off and adjust the Reverb Parameter/Level.
Controller Settings
Pioneer DDJ-FLX10 offers a variety of settings and options regarding it's operation.
You can change these settings by connecting your controller, opening VirtualDJ Settings, clicking on OPTIONS tab on the left and then on CONTROLLER category.
The following options will be presented:

All the settings that are exclusive to Pioneer DDJ-FLX10 will be presented on top, starting with the PIFLX10- acronym:
- PIFLX10-timeDisplay: Set the desired time display for the Jog Screen of the device
- PIFLX10-stemsTrigger: Select the way the ACTIVE PART (Stems) buttons will work (Mute or Solo)
- PIFLX10-jogShiftaction: Select the functionality of the Jogwheel when the SHIFT is held down (Seek or Beatgrid Adjust)
- PIFLX10-jogScreenBrightness: Set the desired brightness for the Jog display screen
- PIFLX10-fxScreenBrightness: Set the desired brightness for the FX display screen
- PIFLX10-jogRingBrightness: Set the desired brightness for the Jog ring
- PIFLX10-jogRingColor: Define the Color of the Jog's Ring. If on Stems (default), the Ring will be white if all Stems are enabled or a mix-color of the remaining Stems. The selected color applies to all Decks.
- PIFLX10-demoMode: Set the time that the controller will enter 'Demo Mode' if left alone without any operation
- PIFLX10-autoStandby: Set whether the device should automatically enter standby mode
- PIFLX10-masterOutputAttenuation: Set the desired attenuation level of master output
- PIFLX10-boothOutputAttenuation: Set the desired attenuation level of booth output
- PIFLX10-masterOutputStereo: Set whether the master output should be stereo or monaural
- PIFLX10-boothOutputStereo: Set whether the booth output should be stereo or monaural
- PIFLX10-masterOutputLimiter: Enable the device built-in Peak Stop Limiter on Master Output
- PIFLX10-micRecord: If set to Yes, the signal from the Microphone inputs will be recorded/broadcasted along with your mix.
- PIFLX10-micToMasterLimiter: Enable a Peak Stop Limiter for the mic when audible on Master Output
- PIFLX10-micToBoothLimiter: Enable a Peak Stop Limiter for the mic when audible on Booth Output
- PIFLX10-micAudibleToBooth: Set whether the mic should be audible on Booth Output
- PIFLX10-micTalkOverLevel: Set the threshold for mic talk-over function
- PIFLX10-slipModeFlash: Set whether or not the pads should blink when slip mode gets enabled
- PIFLX10-slipButtonLed: Set whether or not the slip button should blink when slip mode gets enabled
- PIFLX10-jogBlinkWarning: Set whether or not the Jog Ring should blink as a warning near the end of the track
- PIFLX10-crossfaderCutLag: Adjust the crossfader cut point
Please note that any changes made on these settings take effect immediately.
