PLAY: Play/Pause the track. Hold SHIFT and then press this button to play the track in Stutter mode (while pressed)
CUE: When the Deck is paused, you can set a temporary Cue Point by moving the Platter to place the Audio Pointer at the desired location and then pressing the Cue Button. During playback, you can press the Cue Button to return the track to this Cue Point. (If you did not set a Cue Point, then it will return to the beginning of the track.). If the Deck is paused, you can press and hold the Cue Button to play the track from the Temporary Cue Point. Releasing the Cue Button will return the track to the temporary Cue Point and pause it. To continue playback without returning to the Temporary Cue Point, press and hold the Cue Button, then press and hold the Play Button, and then release both buttons. Hold SHIFT and then press this button to return to the beginning of the track
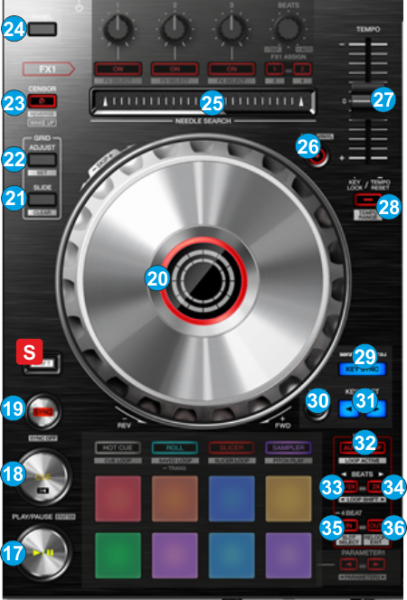
SYNC: Syncs the deck with the opposite one. Hold SHIFT and then press this button to set the deck as Master Deck. Using 4 decks skins, all other decks will sync to the Master Deck.
JOG: Touch sensitive platter for scratching (vinyl mode) or bending (CD Mode). Hold SHIFT and use the JOG in Seek (Search) mode. The Jog is also used to adjust the Beat Grid (CBG) and fine-adjust the Loop In and Out points of a Loop. The LED Ring of the Jog can display various information and by default will be red when Deck 1 and Deck 2 are selected as Mixer Channel sources, Orange when Deck 3 and Deck 4 are selected and Off when the PHONO/LINE Inputs are selected as Mixer Channel sources. See Settings Chapter for further details.
GRID SLIDE: Press and hold this button and then move the Jogwheel to shift the CBG of the track forward/backwards in time. Hold down SHIFT and press this button to reanalyze the BPM of the track and clear any changes you may have made before.
GRID ADJUST: Press and hold this button and then move the Jogwheel to adjust the width of the CBG of the track (equal to adjust the BPM of the track), keeping the First Beat position unchanged. Hold down SHIFT and press this button to set the current position of the track as the First Beat.
CENSOR: Press and hold this button to play the track backwards. On release the track will resume playing from the position it would have been if the button was never pressed. Hold SHIFT down, and then use this button (momentarily) to play the track backwards. Press again to play forward.
PANEL : (Available on left side only) Use this button to cycle though the available Mixer panels of the default VirtualDJ GUI (Mixer, Video, Scratch and Master). Hold SHIFT down and then press this button to toggle between the normal and Large Browser (with Mini Decks) views.
NEEDLE SEARCH: The length of this strip represents the length of the entire track. Place your finger on a point along this sensor to jump to that point in the track (song position). Please note that while a deck is playing “on air” the strip search will not function in order to prevent sudden accidental jumps that may occur if you touch the stripe by accident while you operate other controls. If you want to jump on a new position while the track is “on air” hold down SHIFT button first and then touch the strip to bypass security.
SLIP: Enables Slip Mode on left/right deck. Several software functions (such as Jogwheel movements, HotCues and Loops) will apply temporary on the track, and the track will return to the position it would have been when those functions are not triggered. Hold SHIFT and then use this button to set the Jog to Vinyl/Scratch mode (LED will be turned on) or Cd/Bend mode (LED will be Off)
PITCH FADER : Adjusts the Tempo of the track loaded to the left/right selected Deck
KEYLOCK: Press this button to enable/disable the Master Tempo (Key Lock) of the deck. Press and hold the same button for more than 2 seconds to reset the Tempo (PITCH) to zero position. Hold SHIFT and press this button to select the next available Pitch range for the PITCH/Tempo Slider.
KEY SYNC : Press this button to match the key of the left/right selected deck to the value of the opposite (or Master) deck
KEY RESET : Press this button to reset the key of the left/right selected deck to its original value
KEY ADJUST : Use these buttons to move the key of the track by 1 semitone plus/minus. When both LEDs of these buttons are off, the key is at its original value.
AUTOLOOP: Enables/disables a Loop. of the selected size in beats
1/2X: Halves the size of the Loop. When a Loop is active, hold SHIFT down and then press this button to move the loop backwards by 1 beat.
2X: Doubles the size of the Loop. When a Loop is active, hold SHIFT down and then press this button to move the loop forward by 1 beat.
IN: Use this button to set current track's position as the start position of a manual loop. When loop is active use this button to set the Jogwheel to Loop In Adjust mode (LED will flash) and then use the Jogwheel to fine-adjust the Loop In position. Hold SHIFT down and then use this button to save the current Loop to the default slot. If a Loop is saved, use this button to activate (load & prepare) the loop. Hold SHIFT and then hold the same button for more than 2 seconds to delete the saved loop.
OUT: Use this button to set current track's position as the end position of a manual loop. When loop is active use this button to set the Jogwheel to Loop Out Adjust mode (LED will flash) and then use the Jogwheel to fine-adjust the Loop Out position. Press and hold this button for more than 2 seconds to trigger a 4 Beats loop at the current position. Hold SHIFT down and then use this button to activate and jump to the last triggered loop. Press again to exit the loop