Stanton - SCS.1d - Controlli
Hotcues & Loops
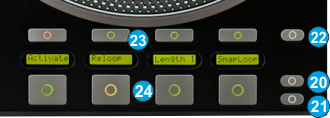
The 4 large (24) and the 4 smaller (23) buttons of this section offer HotCues and Loop functions depending on the selected mode.
- LOOP MODE. Press this button to set the 8 buttons to Loop mode. The led of this button will turn on to indicate the selected mode. Press the same button again to set the 8 buttons to HotCue mode (default).
- SAVED LOOP MODE. Press this button to set the 8 buttons to Saved Loop mode. The led of this button will turn on to indicate the selected mode. Press the same button again to set the 8 buttons to HotCue mode (default).
- INFO LCD. Use this button to change the displayed info in HotCue mode for the 4 LCD displays. The LCD displays can offer Cue Name, Cue Time, time from Cue and Beats to Cue information.
- SMALL BOTTOM (1-4) These 4 buttons offer different functions depending on the selected mode.
In HotCues mode, use these buttons to delete the assigned HotCue points (1 to 4).
In Loop mode, use these buttons to select one of the available 4 Loop sub-modes (Manual, Edit, Quick Loop, Loop Roll)
In Saved Loop mode, use these buttons to delete the saved Loop.
- LARGE DOWN (1-4). These 4 buttons offer different functions depending on the selected mode.
In HotCues mode the 4 buttons assign a Hot Cue Point (1 to 4) or returns the track to that Hot Cue Point. When a Hot Cue Button is unlit, you can assign a Hot Cue Point by pressing it at the desired point in your track. Once it is assigned, the Hot Cue Button will light. To return to that Hot Cue Point, simply press it.
The LCD will display ‘NO CUE’ if no HotCue is assigned to this button and other information depending on the info mode (22) button
In Loop mode use the 4 upper buttons to select the Loop sub-mode.
If the 1st small button is selected (Manual Loop sub-mode), use the 1st button from left to set an Entry Loop (Loop In) point. The 2nd from left will set the Loop Exit (Loop Out) point. Use the 3rd button from left to trigger a loop of a preselected size or exit the Loop. Use the 4th button to trigger the last used loop (Re-loop)
If the 2nd small button is selected (Edit Loop sub-mode), use the 1st button from left to half the size of the loop and the 2nd from left to double its size. Use the 3rd and 4th buttons to move the triggered loop by 1 beat backwards or forward.
If the 3rd small button is selected (Quick Loop sub-mode), use these buttons to trigger a pre-defined quick loop of 1, 2, 4 or 8 beats
If the 4th small button is selected (Saved Loops sub-mode), use the buttons to trigger a momentary loop roll of 1/8, ¼, ½ or 1 beats.
In Saved Loop mode use these 4 buttons to save the last used loop to an empty slot, or enable/disable (arm) the saved loop if saved.
The LCD displays above each button will show the assigned action depending on the selected mode or sub mode.


