


broadcastergfx
BROADCASTER GFX VIDEOSKIN
With VirtualDJ you can easily have some nice video layouts displaying during broadcast without having to use 3rd party applications such as OBS etc.
Videoskins is a feature that lets you have creative visuals right on the master video output to show during broadcasts or events.
There are many pre-made videoskins to choose from in Extensions, and you can create your own as well or edit currently made ones.
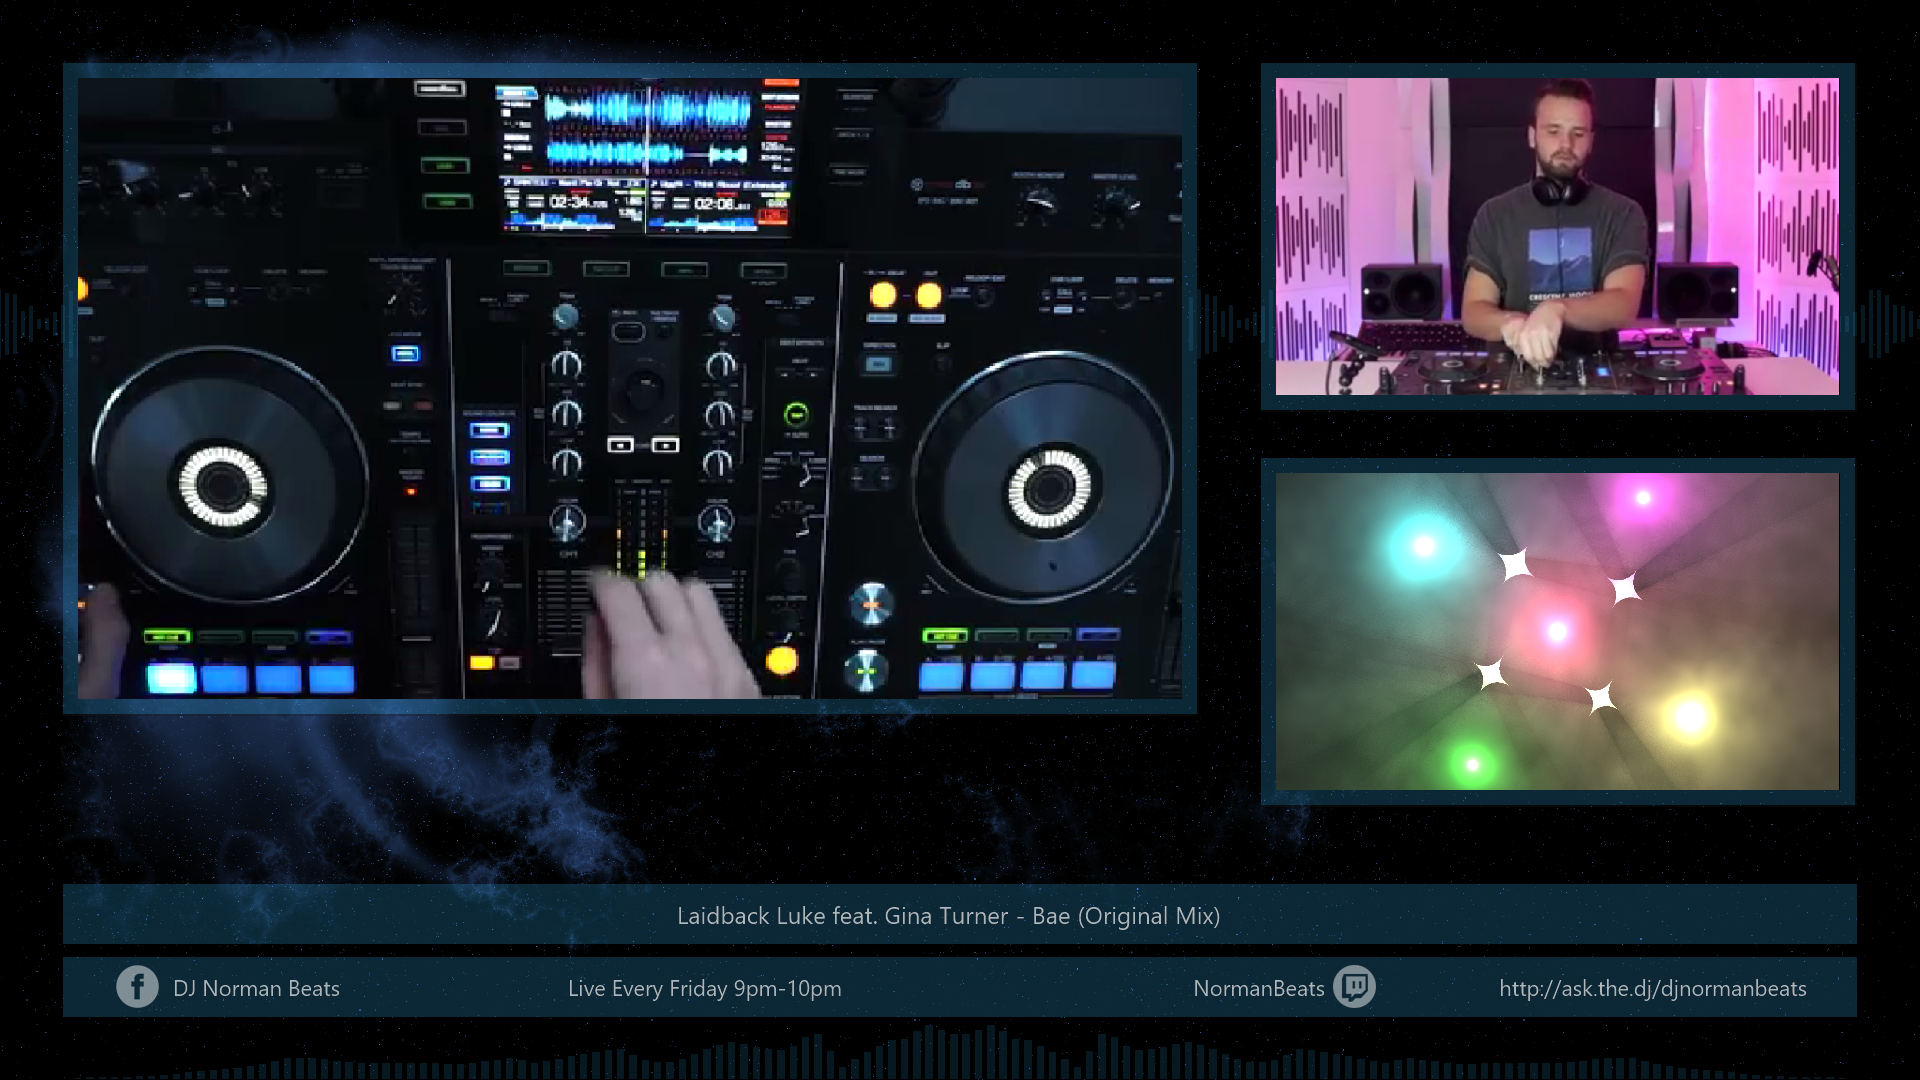
With the Broadcaster GFX Boilerplate videoskin you can show multiple popular views for typical video broadcasters, with such features as dual camera, video and camera in separate views, as well as easily add your own background graphics (and your own custom logo on top)
This videoskin is meant as a "boilerplate" where you can easily "make it your own" by using your own wallpaper background, or video as background, as well as set your own color tones and more. And as a multi-source videoskin it can easily show multiple cameras, master video output, shader visualizations and a combination of them all. And by that completely change the looks and feel of the videoskin and video output.
In this tutorial we'll show you how to use the Broadcaster GFX - Boilerplate for your video broadcasts.
CONTENT:
- To learn how to install this add-on click here
- To learn how to use the add-on, click here
- To learn how to set social media names, click here
- To see some examples/inspirations, click here
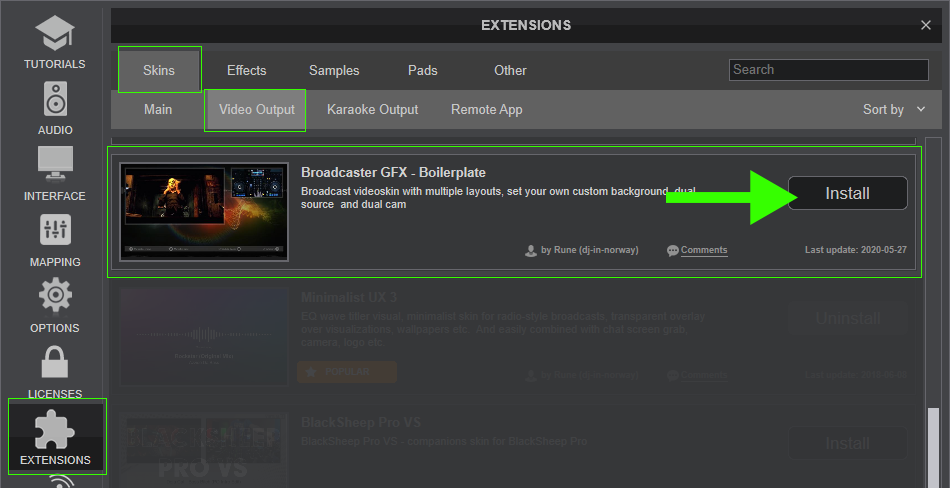
HOW TO INSTALL
1. ADD THE VIDEOSKIN FROM EXTENSIONS
2. ADD THE BCASTER GFX PADS FROM EXTENSIONS
Same as above, Extensions under "PADS". Add this to control the layouts and views of this videoskin

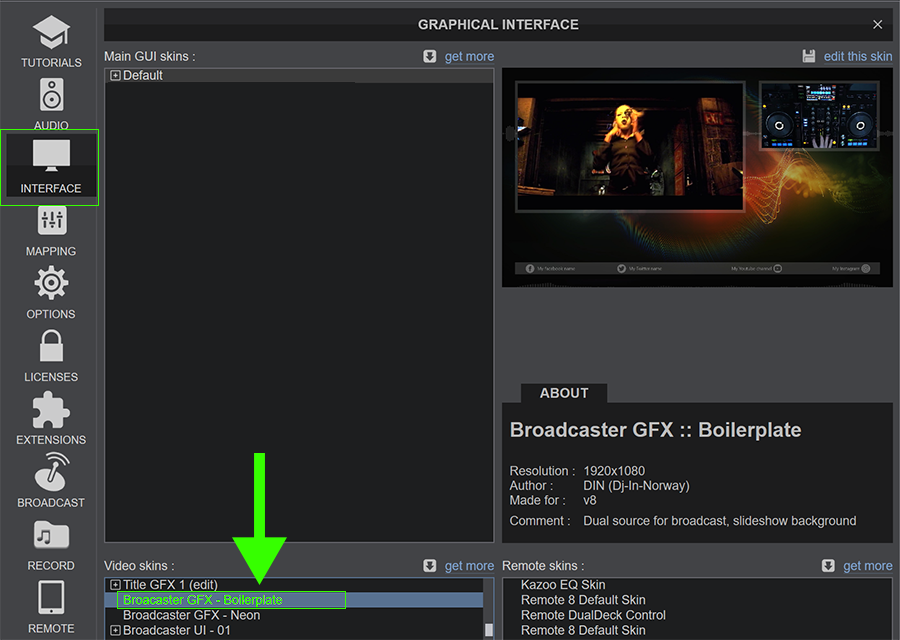
3. SELECT THE SKIN AS VIDEO OUTPUT SKIN
- In settings, under "INTERFACE", select Broadcaster GFX - Boilerplate as the videoskin to use.
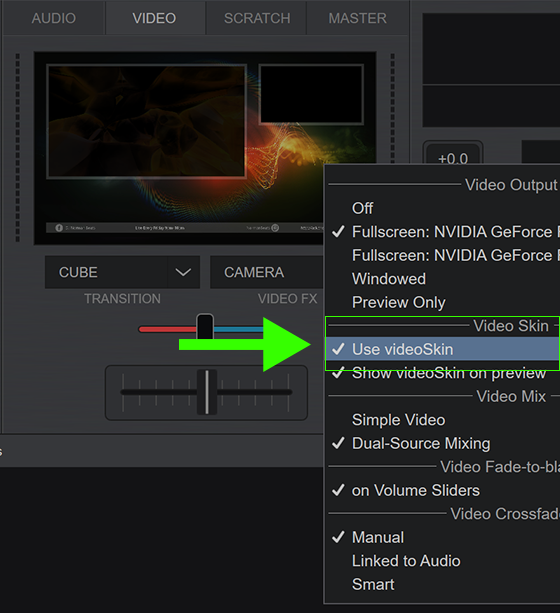
4. CHOOSE TO USE VIDEOSKIN AT OUTPUT
- If you dont see the videoskin at your video output, right-click the master video preview, and select "use video skin"
You should also choose Dual-Source Mixing in same drop-down, since this skin is using multiple sources and video effects available in this mode.
(You can always change back to "simple video view" after, if you prefer)
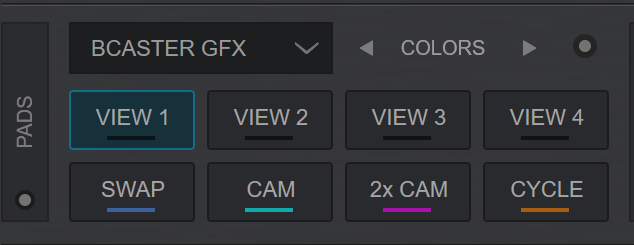
HOW TO USE
To control the videoskin, make sure you have added the Bcaster GFX pads from Extensions
The pads lets you easily change and adapt the videoskin to how you want it.
- VIEW 1 to 4 : Lets you change the current displayed view with different sizes and placements
- SWAP : Swap left and right, or big and small sources (camera, master video etc)
- CAM : turn on and enable camera. In single camera mode, you can use the Camera FX settings to change camera, auto rotate camera etc.
- 2x CAM : turn on and enable seconds camera, if you have (Tips: If you dont have a second camera, you can easily set up and use your phone for this)
- CYCLE : automatically cycle between the available views at interval (can change interval in pad settings, see below)
- COLOR : toggle between different color schemes
In single camera mode, you can use the Camera FX settings to change what camera to use. As well as set timer to automatically rotate cameras.
You can also set Chroma Key for transparent background and more. Learn about the Camera FX [how to use camera|here]]
(Note : You can use your phone as camera, see how here )
In PAD SETTINGS, you find these additional features
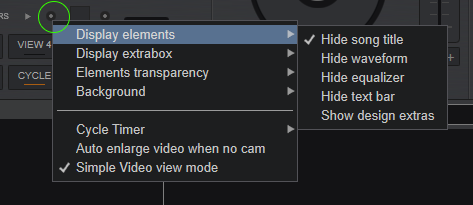
Here you can choose to show/hide such things as Track Display, background waveform etc.
As well as show extra content.
In the Display Extrabox you can opt to show an extra area that can be used for 3rd cam (or master video if using 2 cams).
With a 4-deck skin chosen, you can also use this extra box to show any Video FX on 4th deck, for example ScreenGrab FXto show a chat or similar.
You also find other options such as transparency level for the elements in the videoskin, as well as cycle timer.
Background
Using the Slideshow video effect at master (mixer area) or just from the pad settings, you can easily set your own custom background.
Choose any folder with image(s) or video(s) and they will automatically show as new background in the videoskin.
Alternatively if you first choose a 4-deck skin, you can use the 3rd deck's Shader FX as background.
Combine with a color scheme (see below), or use the Colorize video fx to set the right color tone should you want...
For Slideshow FX ambient video backgrounds you can even download some from here:
https://virtualdj.com/plugins/?addonid=81124
Color Scheme
Using the companion pads, you can easily toggle between color schemes to pick the one that suits you best at the "COLOR" param above the pads.
The default colors are white, black, teal (green), cyan-blue, orange, red and magenta ("purple").
Combine with a matching image or ambient video of your choice, using the Slideshow FX to set background.
If you use the Shader FX on Deck 4 as background, a tip can be to combine with the Colorize FX on deck 4 to color tone a matching color.
.png)
SOCIAL MEDIA TAGS
The videoskin lets you set your own social media handles via vdjscript.
These scripts you can add to the keyboard mapper or custom buttons in the skin to trigger (apply) the script.
To learn how to use Custom Buttons, see here
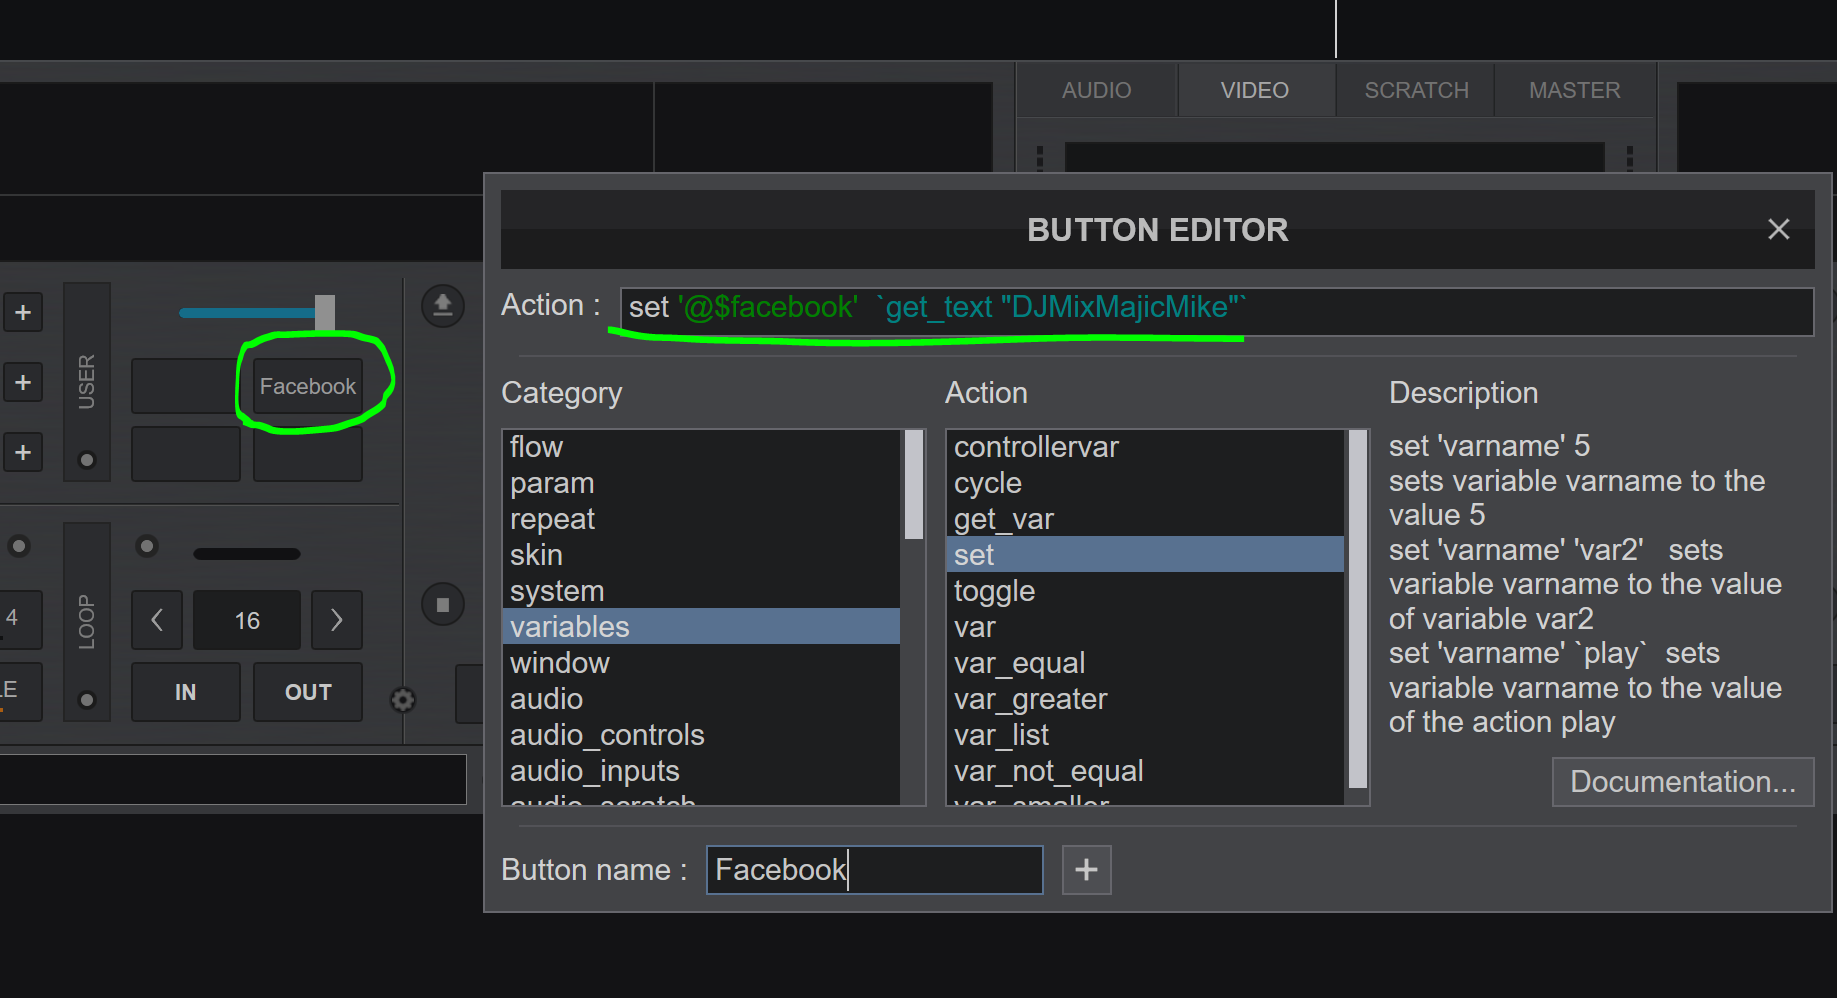
The scripts to use for Social Media names are :
(copy paste and edit the text in between the quotation marks for easy use)
set '@$facebook'  `get_text "Your Facebook name"`
set '@$twitter'  `get_text "Your Twitter handle"`
set '@$youtube'  `get_text "Your Facebook channel"`
set '@$instagram'  `get_text "Your Instagram handle"`
set '@$twitch'  `get_text "Your Twitch channel name"`
set '@$askthedj'  `get_text "Your AskTheDJ handle"`
Notes: If you add Twitch, it overrides and removes Youtube. And if you add AskTheDJ, it does same to Instagram
To display Messages, use the code below at custom buttons (each will remove and override any social media tags from above, when used)
set '@$messagebox1'  `get_text "Text for message box 1 here"`
set '@$messagebox2'  `get_text "Text for message box 2 here"`
set '@$messagebox3'  `get_text "Text for message box 3 here"`
set '@$messagebox4'  `get_text "Text for message box 4 here"`
To remove a message or a social media name/handle:
set '@$messagebox1' 0
set '@$twitch' 0
EXAMPLES FOR INSPIRATION
-