


 jbart19
After taking an inspiration from BeatBreaker and running with it the Mixdeck Stealth PC is finished. Been working on it all night so no pics right now as it is time for bed but for those of you that didn't see the original thread the Stealth PC is basically finding a way to cram an entire PC into the extra space already available inside a standard Mixdeck travel case.
Details and pics to come......
Details and pics to come......
Inviato Thu 29 Sep 11 @ 4:23 am
 synthet1c
nice one, cant wait to read about it.
Inviato Thu 29 Sep 11 @ 4:56 am
jbart19
Here come the pics- I will do a respectable write-up later tonight probably but the pics will tell at least part of the story.
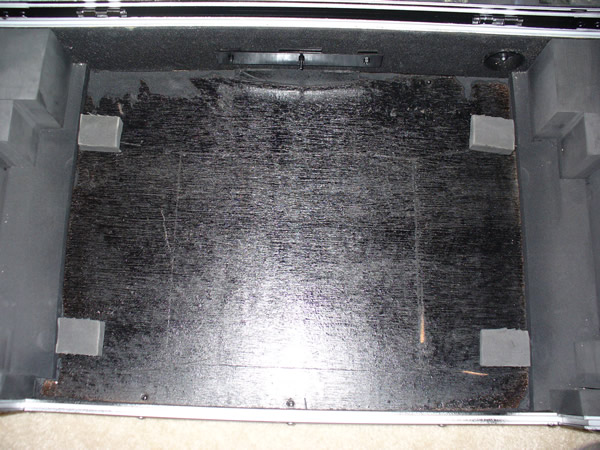
First the bottom of the case - neoprene floor has been removed, wood painted black and neoprene cubes glued in to secure PC Case
Case lid with stabilizing blocks removed, larger block cut in half and doubled up glued into the corners to secure monitor during transport.

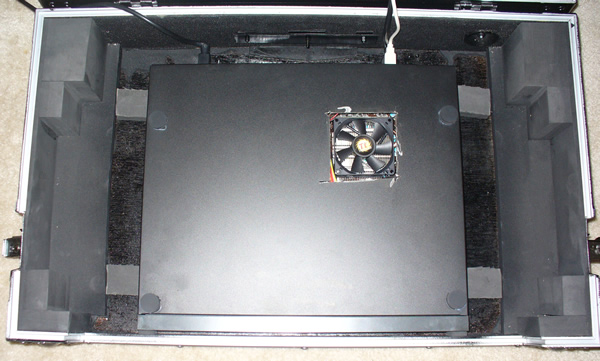
PC installed in case -yes there is a hole for the fan - details will be in the write up- can definitely be done with no hole ;)
Mixdeck goes on top of the PC Case - also in the pic the keyboard supports.

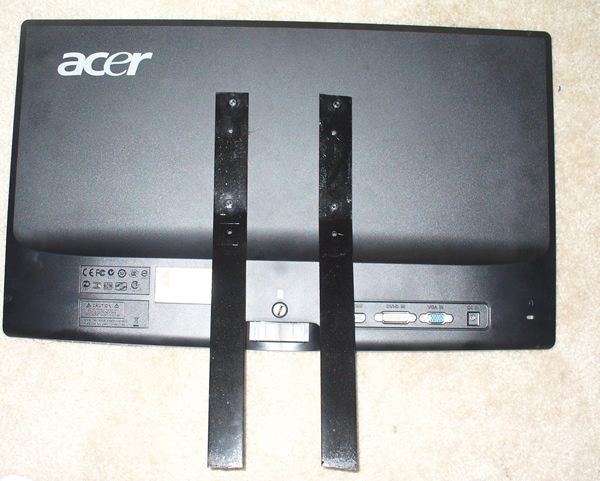
Monitor with the supports attached
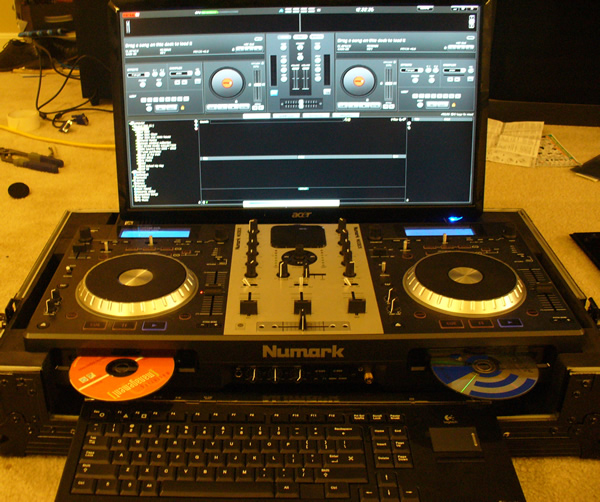
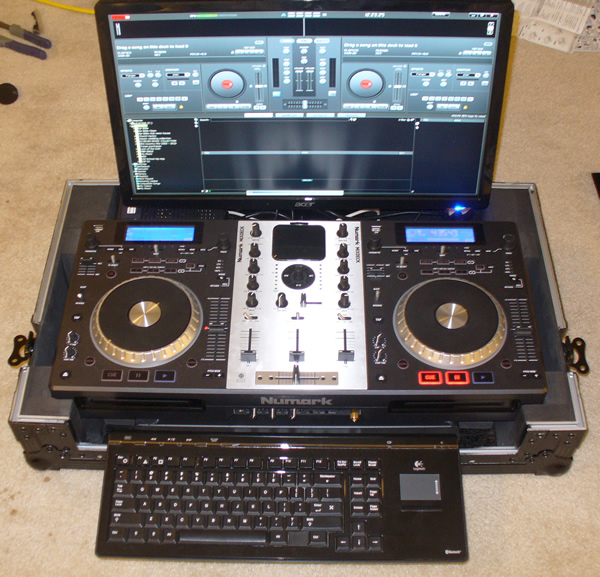
Complete final product - plenty of room to load Cd\'s without Keyboard getting in the way :)
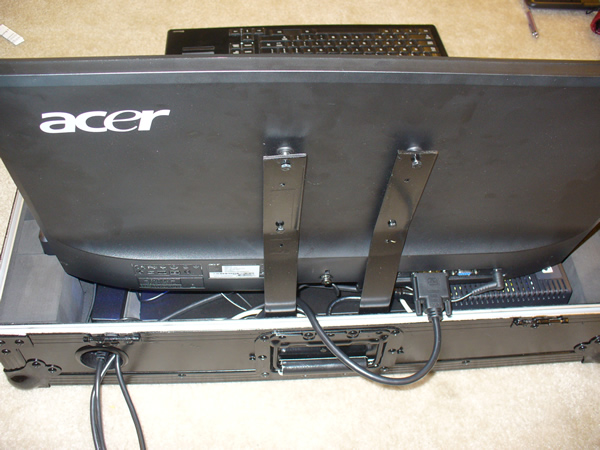
Pic from the rear - nice and tidy cables :)
Another view from the front
Four bolts get undone by hand and everything is ready to put the lid on
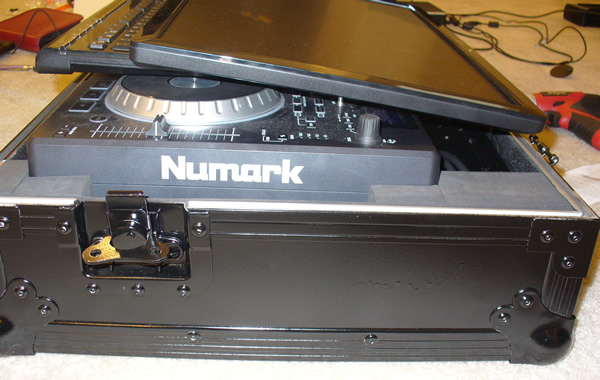
Side view ready to put the lid on - hard to see but the neoprene from the bottom of the case is sandwiched between the mixdeck controls and the keyboard/monitor to protect the controls.
So there you have it the finished product turned out to work just fine. Like anything the 2nd time would go a little smoother and faster but it was a fun project that got everything I need for a gig i(except speakers) into one case.
I will gather my thoughts and try to write a thorough chronicle and some lessons learned for anyone who wants to follow my lead. Until then any questions or critiques are very welcome.
First the bottom of the case - neoprene floor has been removed, wood painted black and neoprene cubes glued in to secure PC Case
Case lid with stabilizing blocks removed, larger block cut in half and doubled up glued into the corners to secure monitor during transport.
PC installed in case -yes there is a hole for the fan - details will be in the write up- can definitely be done with no hole ;)
Mixdeck goes on top of the PC Case - also in the pic the keyboard supports.
Monitor with the supports attached
Complete final product - plenty of room to load Cd\'s without Keyboard getting in the way :)
Pic from the rear - nice and tidy cables :)
Another view from the front
Four bolts get undone by hand and everything is ready to put the lid on
Side view ready to put the lid on - hard to see but the neoprene from the bottom of the case is sandwiched between the mixdeck controls and the keyboard/monitor to protect the controls.
So there you have it the finished product turned out to work just fine. Like anything the 2nd time would go a little smoother and faster but it was a fun project that got everything I need for a gig i(except speakers) into one case.
I will gather my thoughts and try to write a thorough chronicle and some lessons learned for anyone who wants to follow my lead. Until then any questions or critiques are very welcome.
Inviato Thu 29 Sep 11 @ 5:13 pm
 the SOUND INSURGENT
SUPER FRESH!!! I knew it could be done!!
Well done bro!! Gotta get mine started, lol!
Huey
Well done bro!! Gotta get mine started, lol!
Huey
Inviato Thu 29 Sep 11 @ 5:36 pm
jbart19
There are a few things I would do different next time - hit me up when you start doing your build so you don't repeat some of my "learning moments" :)
It is a little heavy too - 60-lbs Not ridiculous but quite a bit more than just the mixdeck.
It is a little heavy too - 60-lbs Not ridiculous but quite a bit more than just the mixdeck.
Inviato Thu 29 Sep 11 @ 5:51 pm
synthet1c
you should shrink that monitor, to a 11 or 12 inch touchscreen
Inviato Thu 29 Sep 11 @ 8:46 pm
jbart19
I can barely stand using the 16" screen on my laptop - I have a tablet i can connect via splashtop if I want to take it into the crowd though ;)
Already paid for lasik once don't want to ruin my eyes too fast looking at small screens in the dark. I absolutely hate typing on smooth touch sensitive screens - phones, tablets whatever just have never gotten used to it.
I honestly couldn't imagine getting through a whole night without a real keyboard.
20/20 right now but use a 27" monitor at work so the 23" in this build actually feels kinda small :) the extra real estate is nice for going 4-deck as well
Inviato Thu 29 Sep 11 @ 9:33 pm
synthet1c
i'd only use the touchscreen for, draging tracks to the decks, keyboards are essential, but id prob just get a mini chicklet number, then again I'm biased, I love my netbook, if only it had a little more power.. and I only really use the screen for browsing songs as I use a resized version of grom
Inviato Thu 29 Sep 11 @ 10:56 pm
jbart19
Ok… here is the write up. Fair warning this will be long and could ramble at times. The journey from idea to final project had many twists and turns. So either run away now or buckle up for the ride
So let’s start with the final build specs. Here is the list of all of the parts I ended up using – if you want my thoughts on why these parts were used or what parts could have been better keep reading after the jump.
CPU: Intel G620 2.6Ghz dual core 65 watt TDP
Mother Board: MSI H67MA-E45 (B3) LGA 1155 Intel H67 HDMI SATA 6Gb/s USB 3.0 Micro ATX
RAM: SAMSUNG 8GB 240-Pin DDR3 SDRAM DDR3 1333 Low Profile
Boot Drive: OCZ Vertex Plus OCZSSD2-1VTXPL6 60GB SATA 3.0Gb/s Internal Solid State Drive
Storage Drive: HITACHI Deskstar 0S03230 3TB 5400 RPM SATA 6.0Gb/s 3.5" Internal Hard Drive
PC Case: Athena Power RM-1U1004M30 Black 1.2mm Steel 1U Rackmount
Monitor: Acer S231HLbid Black 23" 5ms HDMI LED-Backlight LCD monitor Slim Design
Wireless: Rosewill RNX-MiniN1 (RWLD-110001) IEEE 802.11b/g/n, USB2.0 Wireless-N 2.0 Dongle
Bluetooth: AZiO BTD-V201 Micro Bluetooth Adapter USB 2.0
CPU Cooler: Thermaltake Slim X3 CPU Cooler
Case Fans: Noiseblocker NB-BlackSilentFan XM1 40mmx10mm Ultra Quiet Fan - 2800 RPM - 11 dBA
Keyboard: Logitech Cordless MediaBoard Wireless Keyboard
So that is the list of the parts I used in the final build. It isn’t necessarily the parts I would use if I did this again but it definitely ended up working out pretty well. Some parts were chosen because of price, others were the result of availability and my personal lack of patience. Onto how I actually accomplished the final product.
1. – Modify the MixDeck Travel Case
The first part of the project is determining how much space there is to work with within the case and modifying it to hold the PC and be able to mount the monitor. It ends up you have about 3.5” of space to work with. You may be looking at your case going “I don’t have that much space – and there are big foam blocks that hold my mixdeck in place” well I did not say we kept all of the foam intact. The big foam blocks in the lid are just glued in, remove those and keep them, you will need them later. There are also two long thin risers on the bottom of the case, remove those and keep them, you will use them later. Now the bottom and top of the case are both flat layers of neoprene. Using the raised areas on the side of the bottom as a guide cut out and carefully peel away the neoprene from the bottom of the case. You will use this piece of neoprene as a cushion between the controls of the MixDeck and monitor during transport to protect both. Take the larger blocks of neoprene that you removed from the lid and cut them in half resulting in 4 blocks 2.5” wide x 3” tall x 1.5” thick. Glue each pair together into a block 2.5x3x3 and glue each of these blocks into the corner s of the lid on the hinged side. These blocks will keep the monitor from moving side to side during transport. Cut a strip of neoprene 1” wide following the short side from the piece removed from the bottom of the case. This should be a double thickness piece, peel apart the two layers. This will leave you with a 1” wide strip 16” long and about 1/8” thick. Cut 6 pieces 2” long from this strip. Glue 4 of these to the bottom of the PC case, one in each corner. This will isolate the vibrations from the PC, and keep them from resonating in the MixDeck case. Remove the handles from the front of the PC case. Glue the remaining 2 pieces to the face of the PC case one at either the right and left side of the case. Now take one of the risers you removed from bottom of the case and cut 4 pieces at a length of 2.25”. There will be some left over. Place the PC case into the Mixdeck Case bottom with the foam bumpers you just glued on touching the front of the Mixdeck case. Make sure the PC case is centered. There should be 2.25” on either, just enough room to glue in the four neoprene pieces you just made in the corners between the sides of the PC case and neoprene risers on either side of the Mixdeck case. This will keep the PC case from moving side to side. While you could create a mounting system to screw down the PC case to the wood I wanted to be able to easily remove the pc without tools and also wanted as few modifications noticeable from the outside of the Mixdeck case. Ok for now you are done with the case modifications. Let’s move on to the PC.
2. Building the PC
I am going to assume that you have the technical skills to build a PC – it doesn’t take much just a willingness to take it one step at a time and a little attention to detail. First I will discuss each piece that made it into the final build along with other options for that piece.
CPU: Intel G620 2.6Ghz dual core 65 watt TDP
The original idea was to go with a more powerful processor. There were several choices: the I5-2500T, I5-2405S, I3-2120T, and a few others. All of these are rated at 45 watts or less and heat was a main concern for this build due to the tight space requirements and poor airflow of server cases. The problem with these relatively specialized processors was that they were hard to find in-stock and considerably expensive, typically $150 -> $250. My current laptop runs VDJ pretty well so I wanted to make sure the processor was at least as powerful. The processor also needed to have onboard graphics because there would not be room for a graphics card inside the case. At this point I thought about going with an AMD solution that would have the graphics built in to the motherboard but the choice of low power AMD solutions was small and the long-term upgrade path was unclear. I decided I wanted to use an Intel processor that would be compatible with the next generation of processors providing a clear upgrade path in the future. My local computer store had the G620 on sale for $60 so I took a closer look. It fulfilled all of my needs: onboard graphics, better than my laptop processor, compatible with future upgrade options, and a relatively low heat signature. The G620 is rated at 65W but in testing after completing the build my CPU maxes out at 27 watts. I am very happy with the price/performance ratio of this CPU. If you do a lot of video mixing it might be worth the wait and price to get the I3-2100T or I5-2500T.
Mother Board: MSI H67MA-E45 (B3) LGA 1155 Intel H67 HDMI SATA 6Gb/s USB 3.0 Micro ATX
Once I knew that I was going with an Intel socket 1155 CPU it really narrowed down my motherboard options. There are 3 options available. They are the P67, H67, and Z68 styles. The P67 would not work as it does not allow you to use onboard graphics. The H67 and Z68 both support onboard graphics but the Z68 also support overclocking. I would not be overclocking this build and the Z68 boards tend to be a little more expensive and have additional features that would not be used. I settled on the H67 motherboard type. In order to be able to send a signal to both my monitor and an external TV or projector I needed a board with multiple graphics outputs; at least 1 HDMI and 1 DVI. I also wanted USB 3.0 to connect more quickly to an external hard drive. A decent onboard sound processor was also a consideration. The MSI H67MA-E45 fit the bill on all of these requirements and was relatively inexpensive at $90. There were a few additional considerations. The form factor of this motherboard is known as Micro-ATX, which is a little smaller than what you find in a typical PC. The case I am using can use either Micro-ATX or an even smaller version called Mini-ATX. In retrospect I could have used a Mini-ATX board but I wanted the option of installing up to 16GB of RAM for future proofing , and Mini-ITX boards only have 2 RAM banks capable of supporting a maximum of 8GB of RAM total.
RAM: SAMSUNG 8GB 240-Pin DDR3 SDRAM DDR3 1333 Low Profile
This was not a hard choice. With the tight space requirements of the 1U case most of the RAM on the market with integrated fancy heat sinks will not fit. This Samsung RAM is made with smaller more efficient chips that create less heat and are only half as tall as standard RAM. This lowers the temperature inside the case and increases the airflow, both very important. I used 2x4GB to use the advantage of the dual channel memory controller and leave 2 slots open for future upgrades.
Boot Drive: OCZ Vertex Plus OCZSSD2-1VTXPL6 60GB SATA 3.0Gb/s Internal Solid State Drive
This was a happy accident of price and case design. By choosing to go with a Micro-ATX motherboard I had to choose a slightly larger case. The case ended up having enough space for two 3.5” internal bays. I knew one would be taken up by my main HD with the music collection. With the lower powered processor I had chosen I was looking for a way to increase the speed of the system. Putting my OS and programs on this drive was one way to do that. At $60 it fit into the budget and an SSD creates almost no heat. Double win
Storage Drive: HITACHI Deskstar 0S03230 3TB 5400 RPM SATA 6.0Gb/s 3.5" Internal Hard Drive
In the beginning I only knew 2 things about the hard drive I was going to need; I wanted SATA 6.0 and had to have at least 3TB as my music collection is currently 2.1TB and growing. Most 1U cases only have room for 1 hard drive, so I began looking at high performance 3TB hard drives running at 7200RPMs. There were two issues with these drives; they ran hot, and cost close to $200. After deciding on my case a few other options opened up for me. Even with only enough space for 1 hard drive the heat was enough of an issue for me to look at lower speed and less hot 3TB options. The best of these options was the Hitachi DeskStar. It had better transfer speed specs than the Western Digital option and ran about 5’ cooler. I wasn’t really satisfied with the speed of this hard drive option though. While racking my brain at the local PC shop I noticed a sale on some small capacity SSDs. The larger case gave me the option to add one and the lower price of the Hitachi hard drive gave me the budget. This would also keep my OS and programs separate from the music collection, important if I need to upgrade to a larger hard drive for the music collection in the future. As an added benefit the SSD creates almost no heat and having only the music on the standard Hard Drive will mean it needs to spin less and will create even less heat than normal. So for the same price as a 7200RPM drive I get better performance and less heat along with better upgrade paths in the future.
PC Case: Athena Power RM-1U1004M30 Black 1.2mm Steel 1U Rackmount
The seed for this whole build was a post by BeatBreaker that asked if anybody thought a computer he found online could fit into the Mixdeck case. The PC he posted about was in what is called a 1U case, basically the thinnest case used for rack mounted servers, and the only type of case likely possible to fit. The problem was the PC was terribly under powered and outdated. As a person who has built several custom PC’s in the past the challenge seemed like a fun and rewarding project. After doing some basic measurements I thought it was definitely possible but only with a 1U case. After carefully researching options for several of the components I realized I wanted a 1U case that could hold a Micro-ATX motherboard, came with a 300watt power supply already installed, and had space for at least 1 full size hard drive. It also had to fit within the confines of the Mixdeck case. These requirements narrowed my choices down to 2. There was an option from Supermicro and the one I chose from Athena. The Athena case came with a bronze certified power supply and had an open cutout for the connections on the rear of the motherboard giving me the option to choose from a lot more brands. The Supermicro case had a proprietary rear opening that only worked with their motherboards. So unbelievably there is really only 1 option on the market that will work.
Monitor: Acer S231HLbid Black 23" 5ms HDMI LED-Backlight LCD monitor Slim Design
After knowing how much room was in the case and how much would be left over after installing the PC the number of monitors that would fit with the lid closed became rather small. It was necessary to go with an LED based flat panel. It had to be 1.5” at its thickest point, and have a 1920x1080 resolution (personal preference). I had my mind set on an LG monitor that was ultra-thin at 1.2” but was a little expensive and like many ultra-thin monitors did not have any VESA mounting points which had me racking my brain as to how to mount it for use onto the Mixdeck case. In another happy accident at the local PC shop ( one of the best reasons not to do all your shopping on line – instant inspiration) This Acer monitor was on sale for $150 and right on the sign in the middle of the aisle it said “super slim design”. It was thin enough, and to my surprise it had standard VESA mounting points, immediately giving me a way to solidly mount it for use. This solved a design problem and saved me money.
Wireless: Rosewill RNX-MiniN1 (RWLD-110001) IEEE 802.11b/g/n, USB2.0 Wireless-N 2.0 Dongle
The requirements for this adapter were that it support wireless N and be as low profile as possible. This item got good reviews and fit the requirements for less than $15
Bluetooth: AZiO BTD-V201 Micro Bluetooth Adapter USB 2.0
Since I was going to be using a Bluetooth keyboard I needed a Bluetooth adapter. I required that it was BT 2.1 compatible and cheap. This adapter was low profile and about $10
CPU Cooler: Thermaltake Slim X3 CPU Cooler
This was not my first choice and technically does not fit in the PC case. The only CPU fan that fits in a 1U case is the Dynatron K199. I ordered what I thought was a K199 but received a T199 which is designed for a different type of CPU and would not work with my motherboard. The K199 was on backorder from all the stores I checked and I was not patient enough to wait. The K199 is 29mm tall and I found the next shortest CPU fan at 36mm. I was not sure if this would fit but it was worth a try. As evidenced by my photos the Slim X3 does not fit inside the 1U case. I had to make a hole in the top of the case for the case to close but the top of the fan basically sits flush with the top of the case and does not really cause a problem. I also think it creates better airflow. For aesthetics it would be best to be patient and wait for the Dynatron fan.
Case Fans: Noiseblocker NB-BlackSilentFan XM1 40mmx10mm Ultra Quiet Fan - 2800 RPM - 11 dBA
The Athena case has a mounting point which holds 4 40mm fans. The ones that came with my case had bad bearings and were very loud and created a lot of vibrations. I replaced them with these. I also used a few small pieces of neoprene to isolate the fan mounting bracket from the PC case. Much quieter and no vibration.
Keyboard: Logitech Cordless MediaBoard Wireless Keyboard
I already owned this keyboard and knew it worked very well for a wireless keyboard. It also had a very necessary but somewhat special feature – a built-in touchpad just like a laptop. This way I did not need a separate mouse. My though was – where the heck would I put a mouse pad?
So those are the parts and the reasons now a few tips on putting them together.
3. Mounting points and final adjustments.
There are two items that needed to be attached to the case during use but be removable for transport: the monitor and keyboard. My solution for both of these took a little metal work, but nothing the average person can’t do. The easier of the two was the keyboard mount. I picked up a pair of 6” angle brackets at the hardware store that were 1” wide and about 1/8” thick steel. I cut one side down to 1.5” – just a bit shorter than depth of the front faceplate on the MixDeck case. I originally fabbed a mounting bracket for these on the inside of the Mixdeck case but realized there was not enough room and at the same time a better solution. Previously you added foam pads to the front of the PC case. This padding gives just enough space to slide the short end of the angle brackets between the front panel of the Mixdeck case and the steel faceplate of the PC case. The PC Case fits snuggly enough into the Mixdeck case to make this a solid mounting option with no permanent bracket. To keep the keyboard in place while in use industrial strength Velcro does the job. To make sure the strips line up between the brackets and the keyboard use the following process. Cut 2 strips of velcro (both sides) and stick them together. Mount the Velcro to each bracket and place the brackets into the space between the two cases. The left bracket should be as far left as possible; the right bracket should be as far right as possible but not covering the USB ports on the front of the PC case. Not concerned with hurting the USB ports but it will make the bracket floppy. Now remove the backing from the top layer of Velcro and lower the keyboard onto it. Press firmly to make sure it sticks and carefully peel apart the keyboard from the brackets – each will have a layer of Velcro. Now you can Velcro the keyboard to the brackets before inserting it to the case and the spacing will always be right.
The other item that needs to be mounted is the monitor. Having VESA mounting points makes this much more straight forward. The way I solved this problem was to buy an $8 piece of 1/8” thick 1-1/4” wide 4ft long steel at the hardware store. I cut two pieces 14” long for vertical supports. I drilled holes into the supports starting ½” from the top of the support that lined up with the VESA mounting points that I could pass the M4 bolts though to secure the supports to the monitor. The only problem with this mounting system was that the bottom of the monitor is thicker than the area with the mounting points. The way around this was two-fold; use slightly longer bolts that allowed the supports to be useful but not rest directly against the back of the monitor, and bend the supports about 15’ in the area between the lower mounting point and thicker section of the monitor. To do this I used the beat it with a hammer method. I placed the support on the concrete step from my garage and stood on one end while the other end hung off the edge where I wanted the bend and simply hit the hanging part with a hammer a few times until it bent to the desired angle. There are better ways but I wanted to illustrate anybody can do it. Supports of 14” are just right to align the bottom of the monitor with the top of the Mixdeck and not so tall as to make the monitor extra wobbly. I still needed a way to attach the supports to the Mixdeck case. I came up with a rather simple solution. I used the remainder of the steel from the hardware store to make a slip mount. I cut five pieces from the steel in the following lengths: 8”, 2.5” and 2x 1.25”. The 2.5” piece will be centered on the 8” strip and the 1.25” pieces will line up with the edges of the 8” piece. This creates 2 channels for the vertical supports to slip into. To mount the retaining strip I lined up the pieces with the 8” strip, sandwiched the metal between two pieces of scrap wood with a pair of clamps and drilled holes so that bolts could pass through them. I then centered the took the 8” strip and clamped it to the outside of the center of the Mixdeck case and drilled the necessary holes into the case. The center hole is drilled in the metal handle plate and the other two are just to the edge of that plate on either side. I then threaded M4 bolts through the case, the spacers and the 8” retaining strip. I secured the slip mount with nuts on the bolts with threadlocker. The spacers allow the vertical supports to slide behind the 8” retaining strip and keep the monitor from falling over.
Now all of the physical aspects of the build are complete. There are a few final touches and considerations. For looks I spray painted the bottom of the Mixdeck case black and while at it painted the monitor retaining bracket, the paint will further secure the nuts in place. For easier cable management I ordered an 18” USB cable to connect the Mixdeck to the PC and an 18” HDMI ->DVI cable to connect the monitor since there is not room for the DVI connector between the PC and the back of the Mixdeck case and the HDMI input on the monitor is covered by the vertical support. I also purchased some 12” USB 3.0 and 2.0 cables to leave in place to make it easier to connect my external hard drive to do backups.
4. Transport
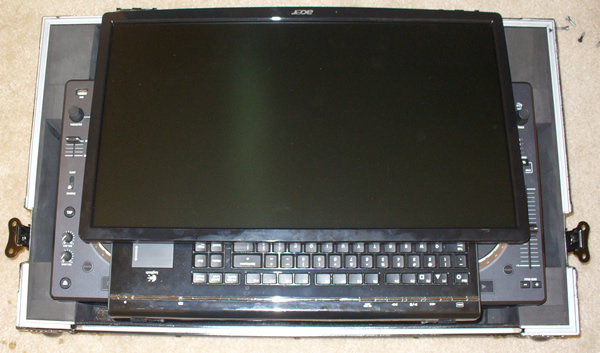
To transport everything in the Mixdeck case: remove the 4 bolts from the monitor mounts, place the neoprene from the bottom of the Mixdeck case over the Mixdeck controls, place the keyboard face up on top of the neoprene with the rear of the keyboard at the front edge of the Mixdeck case, then place the monitor face-up with the bottom of the monitor aligned against the rear edge of the Mixdeck case. Make sure the monitor is centered. Lower the lid and the monitor will fit between the corner blocks you installed into the lid earlier. The fit will be snug, but there are several layers of neoprene that will absorb the pressure and keep everything from sliding around. I will say that the one drawback of packing all that into one case is weight. The total package weighs in at 60lbs.
That’s it. From a random idea to a finished product; this was a fun and challenging project that I thought might be something other Mixdeck users could be interested in.
If you want to follow my lead and have any questions that weren’t covered feel free to ask. Critiques are also welcome.
So let’s start with the final build specs. Here is the list of all of the parts I ended up using – if you want my thoughts on why these parts were used or what parts could have been better keep reading after the jump.
CPU: Intel G620 2.6Ghz dual core 65 watt TDP
Mother Board: MSI H67MA-E45 (B3) LGA 1155 Intel H67 HDMI SATA 6Gb/s USB 3.0 Micro ATX
RAM: SAMSUNG 8GB 240-Pin DDR3 SDRAM DDR3 1333 Low Profile
Boot Drive: OCZ Vertex Plus OCZSSD2-1VTXPL6 60GB SATA 3.0Gb/s Internal Solid State Drive
Storage Drive: HITACHI Deskstar 0S03230 3TB 5400 RPM SATA 6.0Gb/s 3.5" Internal Hard Drive
PC Case: Athena Power RM-1U1004M30 Black 1.2mm Steel 1U Rackmount
Monitor: Acer S231HLbid Black 23" 5ms HDMI LED-Backlight LCD monitor Slim Design
Wireless: Rosewill RNX-MiniN1 (RWLD-110001) IEEE 802.11b/g/n, USB2.0 Wireless-N 2.0 Dongle
Bluetooth: AZiO BTD-V201 Micro Bluetooth Adapter USB 2.0
CPU Cooler: Thermaltake Slim X3 CPU Cooler
Case Fans: Noiseblocker NB-BlackSilentFan XM1 40mmx10mm Ultra Quiet Fan - 2800 RPM - 11 dBA
Keyboard: Logitech Cordless MediaBoard Wireless Keyboard
So that is the list of the parts I used in the final build. It isn’t necessarily the parts I would use if I did this again but it definitely ended up working out pretty well. Some parts were chosen because of price, others were the result of availability and my personal lack of patience. Onto how I actually accomplished the final product.
1. – Modify the MixDeck Travel Case
The first part of the project is determining how much space there is to work with within the case and modifying it to hold the PC and be able to mount the monitor. It ends up you have about 3.5” of space to work with. You may be looking at your case going “I don’t have that much space – and there are big foam blocks that hold my mixdeck in place” well I did not say we kept all of the foam intact. The big foam blocks in the lid are just glued in, remove those and keep them, you will need them later. There are also two long thin risers on the bottom of the case, remove those and keep them, you will use them later. Now the bottom and top of the case are both flat layers of neoprene. Using the raised areas on the side of the bottom as a guide cut out and carefully peel away the neoprene from the bottom of the case. You will use this piece of neoprene as a cushion between the controls of the MixDeck and monitor during transport to protect both. Take the larger blocks of neoprene that you removed from the lid and cut them in half resulting in 4 blocks 2.5” wide x 3” tall x 1.5” thick. Glue each pair together into a block 2.5x3x3 and glue each of these blocks into the corner s of the lid on the hinged side. These blocks will keep the monitor from moving side to side during transport. Cut a strip of neoprene 1” wide following the short side from the piece removed from the bottom of the case. This should be a double thickness piece, peel apart the two layers. This will leave you with a 1” wide strip 16” long and about 1/8” thick. Cut 6 pieces 2” long from this strip. Glue 4 of these to the bottom of the PC case, one in each corner. This will isolate the vibrations from the PC, and keep them from resonating in the MixDeck case. Remove the handles from the front of the PC case. Glue the remaining 2 pieces to the face of the PC case one at either the right and left side of the case. Now take one of the risers you removed from bottom of the case and cut 4 pieces at a length of 2.25”. There will be some left over. Place the PC case into the Mixdeck Case bottom with the foam bumpers you just glued on touching the front of the Mixdeck case. Make sure the PC case is centered. There should be 2.25” on either, just enough room to glue in the four neoprene pieces you just made in the corners between the sides of the PC case and neoprene risers on either side of the Mixdeck case. This will keep the PC case from moving side to side. While you could create a mounting system to screw down the PC case to the wood I wanted to be able to easily remove the pc without tools and also wanted as few modifications noticeable from the outside of the Mixdeck case. Ok for now you are done with the case modifications. Let’s move on to the PC.
2. Building the PC
I am going to assume that you have the technical skills to build a PC – it doesn’t take much just a willingness to take it one step at a time and a little attention to detail. First I will discuss each piece that made it into the final build along with other options for that piece.
CPU: Intel G620 2.6Ghz dual core 65 watt TDP
The original idea was to go with a more powerful processor. There were several choices: the I5-2500T, I5-2405S, I3-2120T, and a few others. All of these are rated at 45 watts or less and heat was a main concern for this build due to the tight space requirements and poor airflow of server cases. The problem with these relatively specialized processors was that they were hard to find in-stock and considerably expensive, typically $150 -> $250. My current laptop runs VDJ pretty well so I wanted to make sure the processor was at least as powerful. The processor also needed to have onboard graphics because there would not be room for a graphics card inside the case. At this point I thought about going with an AMD solution that would have the graphics built in to the motherboard but the choice of low power AMD solutions was small and the long-term upgrade path was unclear. I decided I wanted to use an Intel processor that would be compatible with the next generation of processors providing a clear upgrade path in the future. My local computer store had the G620 on sale for $60 so I took a closer look. It fulfilled all of my needs: onboard graphics, better than my laptop processor, compatible with future upgrade options, and a relatively low heat signature. The G620 is rated at 65W but in testing after completing the build my CPU maxes out at 27 watts. I am very happy with the price/performance ratio of this CPU. If you do a lot of video mixing it might be worth the wait and price to get the I3-2100T or I5-2500T.
Mother Board: MSI H67MA-E45 (B3) LGA 1155 Intel H67 HDMI SATA 6Gb/s USB 3.0 Micro ATX
Once I knew that I was going with an Intel socket 1155 CPU it really narrowed down my motherboard options. There are 3 options available. They are the P67, H67, and Z68 styles. The P67 would not work as it does not allow you to use onboard graphics. The H67 and Z68 both support onboard graphics but the Z68 also support overclocking. I would not be overclocking this build and the Z68 boards tend to be a little more expensive and have additional features that would not be used. I settled on the H67 motherboard type. In order to be able to send a signal to both my monitor and an external TV or projector I needed a board with multiple graphics outputs; at least 1 HDMI and 1 DVI. I also wanted USB 3.0 to connect more quickly to an external hard drive. A decent onboard sound processor was also a consideration. The MSI H67MA-E45 fit the bill on all of these requirements and was relatively inexpensive at $90. There were a few additional considerations. The form factor of this motherboard is known as Micro-ATX, which is a little smaller than what you find in a typical PC. The case I am using can use either Micro-ATX or an even smaller version called Mini-ATX. In retrospect I could have used a Mini-ATX board but I wanted the option of installing up to 16GB of RAM for future proofing , and Mini-ITX boards only have 2 RAM banks capable of supporting a maximum of 8GB of RAM total.
RAM: SAMSUNG 8GB 240-Pin DDR3 SDRAM DDR3 1333 Low Profile
This was not a hard choice. With the tight space requirements of the 1U case most of the RAM on the market with integrated fancy heat sinks will not fit. This Samsung RAM is made with smaller more efficient chips that create less heat and are only half as tall as standard RAM. This lowers the temperature inside the case and increases the airflow, both very important. I used 2x4GB to use the advantage of the dual channel memory controller and leave 2 slots open for future upgrades.
Boot Drive: OCZ Vertex Plus OCZSSD2-1VTXPL6 60GB SATA 3.0Gb/s Internal Solid State Drive
This was a happy accident of price and case design. By choosing to go with a Micro-ATX motherboard I had to choose a slightly larger case. The case ended up having enough space for two 3.5” internal bays. I knew one would be taken up by my main HD with the music collection. With the lower powered processor I had chosen I was looking for a way to increase the speed of the system. Putting my OS and programs on this drive was one way to do that. At $60 it fit into the budget and an SSD creates almost no heat. Double win
Storage Drive: HITACHI Deskstar 0S03230 3TB 5400 RPM SATA 6.0Gb/s 3.5" Internal Hard Drive
In the beginning I only knew 2 things about the hard drive I was going to need; I wanted SATA 6.0 and had to have at least 3TB as my music collection is currently 2.1TB and growing. Most 1U cases only have room for 1 hard drive, so I began looking at high performance 3TB hard drives running at 7200RPMs. There were two issues with these drives; they ran hot, and cost close to $200. After deciding on my case a few other options opened up for me. Even with only enough space for 1 hard drive the heat was enough of an issue for me to look at lower speed and less hot 3TB options. The best of these options was the Hitachi DeskStar. It had better transfer speed specs than the Western Digital option and ran about 5’ cooler. I wasn’t really satisfied with the speed of this hard drive option though. While racking my brain at the local PC shop I noticed a sale on some small capacity SSDs. The larger case gave me the option to add one and the lower price of the Hitachi hard drive gave me the budget. This would also keep my OS and programs separate from the music collection, important if I need to upgrade to a larger hard drive for the music collection in the future. As an added benefit the SSD creates almost no heat and having only the music on the standard Hard Drive will mean it needs to spin less and will create even less heat than normal. So for the same price as a 7200RPM drive I get better performance and less heat along with better upgrade paths in the future.
PC Case: Athena Power RM-1U1004M30 Black 1.2mm Steel 1U Rackmount
The seed for this whole build was a post by BeatBreaker that asked if anybody thought a computer he found online could fit into the Mixdeck case. The PC he posted about was in what is called a 1U case, basically the thinnest case used for rack mounted servers, and the only type of case likely possible to fit. The problem was the PC was terribly under powered and outdated. As a person who has built several custom PC’s in the past the challenge seemed like a fun and rewarding project. After doing some basic measurements I thought it was definitely possible but only with a 1U case. After carefully researching options for several of the components I realized I wanted a 1U case that could hold a Micro-ATX motherboard, came with a 300watt power supply already installed, and had space for at least 1 full size hard drive. It also had to fit within the confines of the Mixdeck case. These requirements narrowed my choices down to 2. There was an option from Supermicro and the one I chose from Athena. The Athena case came with a bronze certified power supply and had an open cutout for the connections on the rear of the motherboard giving me the option to choose from a lot more brands. The Supermicro case had a proprietary rear opening that only worked with their motherboards. So unbelievably there is really only 1 option on the market that will work.
Monitor: Acer S231HLbid Black 23" 5ms HDMI LED-Backlight LCD monitor Slim Design
After knowing how much room was in the case and how much would be left over after installing the PC the number of monitors that would fit with the lid closed became rather small. It was necessary to go with an LED based flat panel. It had to be 1.5” at its thickest point, and have a 1920x1080 resolution (personal preference). I had my mind set on an LG monitor that was ultra-thin at 1.2” but was a little expensive and like many ultra-thin monitors did not have any VESA mounting points which had me racking my brain as to how to mount it for use onto the Mixdeck case. In another happy accident at the local PC shop ( one of the best reasons not to do all your shopping on line – instant inspiration) This Acer monitor was on sale for $150 and right on the sign in the middle of the aisle it said “super slim design”. It was thin enough, and to my surprise it had standard VESA mounting points, immediately giving me a way to solidly mount it for use. This solved a design problem and saved me money.
Wireless: Rosewill RNX-MiniN1 (RWLD-110001) IEEE 802.11b/g/n, USB2.0 Wireless-N 2.0 Dongle
The requirements for this adapter were that it support wireless N and be as low profile as possible. This item got good reviews and fit the requirements for less than $15
Bluetooth: AZiO BTD-V201 Micro Bluetooth Adapter USB 2.0
Since I was going to be using a Bluetooth keyboard I needed a Bluetooth adapter. I required that it was BT 2.1 compatible and cheap. This adapter was low profile and about $10
CPU Cooler: Thermaltake Slim X3 CPU Cooler
This was not my first choice and technically does not fit in the PC case. The only CPU fan that fits in a 1U case is the Dynatron K199. I ordered what I thought was a K199 but received a T199 which is designed for a different type of CPU and would not work with my motherboard. The K199 was on backorder from all the stores I checked and I was not patient enough to wait. The K199 is 29mm tall and I found the next shortest CPU fan at 36mm. I was not sure if this would fit but it was worth a try. As evidenced by my photos the Slim X3 does not fit inside the 1U case. I had to make a hole in the top of the case for the case to close but the top of the fan basically sits flush with the top of the case and does not really cause a problem. I also think it creates better airflow. For aesthetics it would be best to be patient and wait for the Dynatron fan.
Case Fans: Noiseblocker NB-BlackSilentFan XM1 40mmx10mm Ultra Quiet Fan - 2800 RPM - 11 dBA
The Athena case has a mounting point which holds 4 40mm fans. The ones that came with my case had bad bearings and were very loud and created a lot of vibrations. I replaced them with these. I also used a few small pieces of neoprene to isolate the fan mounting bracket from the PC case. Much quieter and no vibration.
Keyboard: Logitech Cordless MediaBoard Wireless Keyboard
I already owned this keyboard and knew it worked very well for a wireless keyboard. It also had a very necessary but somewhat special feature – a built-in touchpad just like a laptop. This way I did not need a separate mouse. My though was – where the heck would I put a mouse pad?
So those are the parts and the reasons now a few tips on putting them together.
3. Mounting points and final adjustments.
There are two items that needed to be attached to the case during use but be removable for transport: the monitor and keyboard. My solution for both of these took a little metal work, but nothing the average person can’t do. The easier of the two was the keyboard mount. I picked up a pair of 6” angle brackets at the hardware store that were 1” wide and about 1/8” thick steel. I cut one side down to 1.5” – just a bit shorter than depth of the front faceplate on the MixDeck case. I originally fabbed a mounting bracket for these on the inside of the Mixdeck case but realized there was not enough room and at the same time a better solution. Previously you added foam pads to the front of the PC case. This padding gives just enough space to slide the short end of the angle brackets between the front panel of the Mixdeck case and the steel faceplate of the PC case. The PC Case fits snuggly enough into the Mixdeck case to make this a solid mounting option with no permanent bracket. To keep the keyboard in place while in use industrial strength Velcro does the job. To make sure the strips line up between the brackets and the keyboard use the following process. Cut 2 strips of velcro (both sides) and stick them together. Mount the Velcro to each bracket and place the brackets into the space between the two cases. The left bracket should be as far left as possible; the right bracket should be as far right as possible but not covering the USB ports on the front of the PC case. Not concerned with hurting the USB ports but it will make the bracket floppy. Now remove the backing from the top layer of Velcro and lower the keyboard onto it. Press firmly to make sure it sticks and carefully peel apart the keyboard from the brackets – each will have a layer of Velcro. Now you can Velcro the keyboard to the brackets before inserting it to the case and the spacing will always be right.
The other item that needs to be mounted is the monitor. Having VESA mounting points makes this much more straight forward. The way I solved this problem was to buy an $8 piece of 1/8” thick 1-1/4” wide 4ft long steel at the hardware store. I cut two pieces 14” long for vertical supports. I drilled holes into the supports starting ½” from the top of the support that lined up with the VESA mounting points that I could pass the M4 bolts though to secure the supports to the monitor. The only problem with this mounting system was that the bottom of the monitor is thicker than the area with the mounting points. The way around this was two-fold; use slightly longer bolts that allowed the supports to be useful but not rest directly against the back of the monitor, and bend the supports about 15’ in the area between the lower mounting point and thicker section of the monitor. To do this I used the beat it with a hammer method. I placed the support on the concrete step from my garage and stood on one end while the other end hung off the edge where I wanted the bend and simply hit the hanging part with a hammer a few times until it bent to the desired angle. There are better ways but I wanted to illustrate anybody can do it. Supports of 14” are just right to align the bottom of the monitor with the top of the Mixdeck and not so tall as to make the monitor extra wobbly. I still needed a way to attach the supports to the Mixdeck case. I came up with a rather simple solution. I used the remainder of the steel from the hardware store to make a slip mount. I cut five pieces from the steel in the following lengths: 8”, 2.5” and 2x 1.25”. The 2.5” piece will be centered on the 8” strip and the 1.25” pieces will line up with the edges of the 8” piece. This creates 2 channels for the vertical supports to slip into. To mount the retaining strip I lined up the pieces with the 8” strip, sandwiched the metal between two pieces of scrap wood with a pair of clamps and drilled holes so that bolts could pass through them. I then centered the took the 8” strip and clamped it to the outside of the center of the Mixdeck case and drilled the necessary holes into the case. The center hole is drilled in the metal handle plate and the other two are just to the edge of that plate on either side. I then threaded M4 bolts through the case, the spacers and the 8” retaining strip. I secured the slip mount with nuts on the bolts with threadlocker. The spacers allow the vertical supports to slide behind the 8” retaining strip and keep the monitor from falling over.
Now all of the physical aspects of the build are complete. There are a few final touches and considerations. For looks I spray painted the bottom of the Mixdeck case black and while at it painted the monitor retaining bracket, the paint will further secure the nuts in place. For easier cable management I ordered an 18” USB cable to connect the Mixdeck to the PC and an 18” HDMI ->DVI cable to connect the monitor since there is not room for the DVI connector between the PC and the back of the Mixdeck case and the HDMI input on the monitor is covered by the vertical support. I also purchased some 12” USB 3.0 and 2.0 cables to leave in place to make it easier to connect my external hard drive to do backups.
4. Transport
To transport everything in the Mixdeck case: remove the 4 bolts from the monitor mounts, place the neoprene from the bottom of the Mixdeck case over the Mixdeck controls, place the keyboard face up on top of the neoprene with the rear of the keyboard at the front edge of the Mixdeck case, then place the monitor face-up with the bottom of the monitor aligned against the rear edge of the Mixdeck case. Make sure the monitor is centered. Lower the lid and the monitor will fit between the corner blocks you installed into the lid earlier. The fit will be snug, but there are several layers of neoprene that will absorb the pressure and keep everything from sliding around. I will say that the one drawback of packing all that into one case is weight. The total package weighs in at 60lbs.
That’s it. From a random idea to a finished product; this was a fun and challenging project that I thought might be something other Mixdeck users could be interested in.
If you want to follow my lead and have any questions that weren’t covered feel free to ask. Critiques are also welcome.
Inviato Sat 01 Oct 11 @ 7:24 am
jbart19
4,000 words later the write up is done :)
Inviato Sat 01 Oct 11 @ 7:32 am
the SOUND INSURGENT
Nice job!! I'll be hitting you up in the near future.
Thanks for the info
Huey
Thanks for the info
Huey
Inviato Sat 01 Oct 11 @ 8:14 am
 Jensen_sbp
Nice case! But how about the heat from the fan. If i see this right the fan blows up to the Mixdeck? Mabye try to make some kind of duct for the fan so the hot air can exit the case on the side?
Inviato Sun 02 Oct 11 @ 12:39 pm
jbart19
I took the rubber feet off of the mixdeck and doubled them up in the corners of . It creates a gap about 3/8 of an inch for air flow - But that is why it was so important to use low wattage CPU and other low heat components. No room to make ducts. There are 4 case fans that blow out the sides as well.
I ran the Intel Burn Test on high for 10 runs and the Core Temp only got to 62' it usually hovers in the 30's to low 40'w during normal use. I let VDJ scan for BPM on my collection for 16 hours straight and the highest temp recorded was 48'C
I ran the Intel Burn Test on high for 10 runs and the Core Temp only got to 62' it usually hovers in the 30's to low 40'w during normal use. I let VDJ scan for BPM on my collection for 16 hours straight and the highest temp recorded was 48'C
Inviato Sun 02 Oct 11 @ 4:22 pm