


DDJ-SB2
Pads
The 4 available PADS offer different functionality depending on the selected mode.
HotCues mode
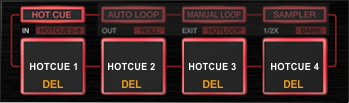 Press the HOT CUE mode button to set the PADs to HotCues mode.
 Each one of the 4 pad assigns a Hot Cue Point (1 to 4) or returns the track to that Hot Cue Point.
When a Hot Cue Button is unlit, you can assign a Hot Cue Point by pressing it at the desired point in your track.
Hold SHIFT and then press a pad to delete its assigned Hot Cue Point. Leds will blink if a HotCue point exists
HotCues 5-8 mode
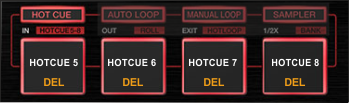 Hold SHIFT and then press the press the HOT CUE mode button to set the PADs to HotCues 5-8 mode. The led of the button will blink to indicate this mode
Each one of the 4 pad assigns a Hot Cue Point (5 to 8) or returns the track to that Hot Cue Point.
When a Hot Cue Button is unlit, you can assign a Hot Cue Point by pressing it at the desired point in your track.
Hold SHIFT and then press a pad to delete its assigned Hot Cue Point. Leds will blink if a HotCue point exists
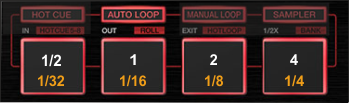
Auto Loop mode
 Press the AUTO LOOP mode button to set the PADs to Auto Loop mode.
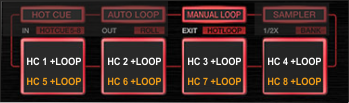
 Each one of the 4 pad triggers a seamless Loop of a different size (in beats). Hold SHIFT and then press the same Pads to trigger a different loop size (see image)
Roll mode
 Hold SHIFT and then press the AUTO LOOP mode button to set the PADs to Roll mode. The led of the button will blink to indicate this mode
Each one of the 4 pad triggers a momentary (while pressed) Loop Roll of a different size (in beats). Hold SHIFT and then press the same Pads to trigger a different size of loop roll (see image)
Manual Loop mode
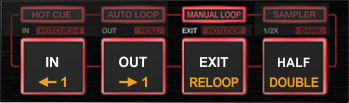 Press the MANUAL LOOP mode button to set the PADs to Manual Loop mode.
 Use the 1st PAD to set a Loop In (Entry) point. Use the 2nd PAD to set the Exit point of the loop (Loop Out). Use the 3rd PAD to exit the Loop. Use the 4rt PAD to half the size of the Loop.
While SHIFT is held, use the 1st and 2nd PADs to move the triggered loop 1 beat backwards or forward. Use the 3rd PAD to activate the last triggered loop (Reloop) and the 4rth PAD to double the size of the Loop.
HotCues - Loop mode
 Hold SHIFT and then press the MANUAL LOOP button to set the PADs to HotCues Loop mode. The led of the button will blink to indicate this mode.
Each one of the 4 pad assigns a Hot Cue Point (1 to 4) or returns the track to that Hot Cue Point, but in both cases, it also triggers a Loop at that point, while the Pad is pressed. Hold SHIFT and then use the same PADs to apply the same functionality for HotCues 5 to 8.
Sampler mode
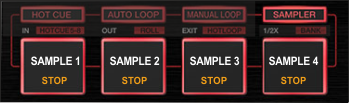 Press the SAMPLER mode button to set the PADs to Sampler mode.
Each one of the 4 pads triggers a sample from the selected Sampler Bank of VirtualDJ. If a bank has less than 5 samples, both sides of the DDJ-SB will control the same samples. If a bank has more than 4 samples, the left side of the DDJ-SB will control samples 1 to 4 and the right side samples 5 to 8
Depending on the selected trigger mode, use SHIFT and the same pads to stop the sample.
Sampler Bank mode
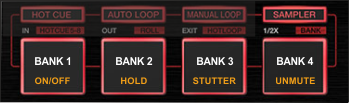 Hold SHIFT and then press the SAMPLER mode button to set the PADs to Sampler Bank mode. The led of the button will blink to indicate this mode.
Use these PADs to select the first 4 Banks* of the VirtualDJ Sampler.
Hold SHIFT and then use the same PADs to select the Trigger Mode of the Samples.
*.VirtualDJ offers unlimited Banks, which can be accessed through the GUI of VirtualDJ
PAD TRANS mode
Use these PADs to apply a “Cut” Effect on the deck. While a PAD is pressed, the Volume of the Deck will be toggling between the zero and the current position at a frequency defined by the size in beats as per the image.
