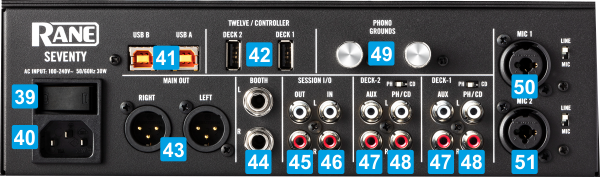
39 POWER SWITCHTurns ON/OFF the power of the device. Please make sure that you have made all the necessary connections on the back of the unit before turning it's power ON.40 POWER CONNECTORConnect a standard IEC power cable.41 USB (Type B) PORTSConnect a standard USB cable to connect Rane Seventy with your computer. You can connect up to two computers by using the two ports of the device (labeled USB A and USB B). Make sure that you turn the channel CH INPUT SWITCHES at the top panel to the correct USB port for software mixing.42 USB (Type A) PORTSConnect your controller (like Rane Twelve) to use the integrated USB HUB of the device.43 MASTER OUTPUTBalanced XLR Master Output. Connect your amplifier of self-amplified speakers.44 BOOTH OUTPUTBalanced TRS 1/4" Booth Output. Connect your booth/zone amplifier or self-amplified speakers.45 SESSION OUTAdditional RCA unbalanced output useful to chain Rane Seventy with another mixer or to connect an external recorder46 SESSION INRCA Input useful to chain Rane Seventy with another mixer or to add any device that provides a line level output on your mix47 DECK 1/2 AUX INPUTSConnect an auxiliary audio source. The sound of these devices will be routed on channel 1/2 of the mixer.when the Input Source switcher at the top panel is set to AUX.48 DECK 1/2 CD/PH INPUTSConnect your analog gear (like CD Players and Turntables). The sound of these devices will be routed on channel 1/2 of the mixer. Attention: When you connect a device on the PH/CD RCA plugs make sure that you also switch the PH/CD switch on the appropriate position depending on the device you have connected. Failing to do so may result in heavy distortion or a very weak signal of the analog source. For DVS (Timecode), set the top-panel Input Source switches to USB49 GROUNDConnect your turntables ground cable (if they offer one).50 MIC 1 INPUTConnect a microphone, or an instrument. When an instrument is connected make sure to turn the LINE/MIC switch to "Line" position.51 MIC 2 INPUTConnect a microphone, or an instrument. When an instrument is connected make sure to turn the LINE/MIC switch to "Line" position.