S. SHIFT. Press and hold any of these buttons down to access secondary functions of the AKAI AFX
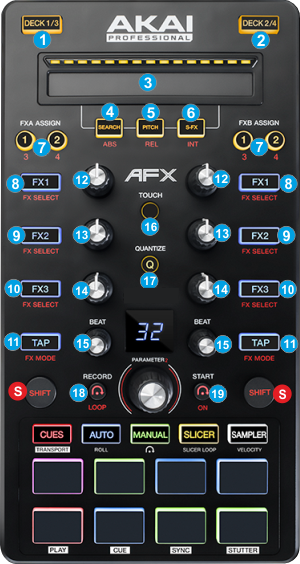
DECK 1/3 SELECT. Use this button to assign the unit to deck* (layer) 1 or 3. The button will light orange if deck 1 is selected, red if deck 3 is selected and will be off if a different deck is selected.
DECK 2/4 SELECT. Use this button to assign the unit to deck* (layer) 2 or 4. The button will light orange if deck 2 is selected, red if deck 4 is selected and will be off if a different deck is selected.
*Note that the DECK button only assigns the controller to a hardware layer and cannot be used to assign any software deck as left or right. The assigned deck will apply to all the functions of the unit except from the FX section.
TOUCH STRIP. The touch strip offers different functionality depending on the selected mode (using the Touch Mode buttons 4, 5 and 6). In Search mode use the touch strip to navigate (seek) through the loaded track of the assigned deck.
Hold SHIFT down and then use the Touch Strip to fine-position or Scratch,Touch Strip.
In Pitch mode touch the Touch Strip anywhere from the middle point to the far right side to temporary speed-up the tempo of the track (Pitch Bend). Touch anywhere from the middle points to the far left side to temporary slow-down the tempo of the track (Pitch Bend). Once released, the tempo will return to the value designated by the pitch fader. Hold SHIFT down and then use the Touch Strip to adjust the tempo (pitch) of the track
SEARCH. Press this button to set the Touch Strip to Search mode. Hold SHIFT down and then press this button to set the Timecode mode to Absolute (for DVS)
PITCH. Press this button to set the Touch Strip to Pitch mode. Hold SHIFT down and then press this button to set the Timecode mode to Relative (for DVS)
S-FX. Press this button to set the Touch Strip to FX mode. Hold SHIFT down and then press this button to set the Timecode mode to Smart (for DVS)
Global
TOUCH. Use this button to enable the Touch mode. When enabled, the FX knobs will offer additional functions when touched.
QUANTIZE. Use this button to enable/disable Smart Cue to all 4 decks. When Smart Cue is enabled the HotCues will snap to the nearest beat (or smaller size depending on the SmartCueQuantize setting)
RECORD. Use this button to start/stop recording your mix. Hold SHIFT down and then use this button to start/stop recording Master to a new Sample (led will blink while recording)
START. Use this button to enable/disable Automix*. Hold SHIFT down and then use this button to enable/disable Sandbox*.
*Read VirtualDJ User Guide for further details on Automix and Sandbox.
PARAMETER ENC (& LCD display). The encoder offers various functions depending on the selected PAD mode (see PADS).
PAD MODE SEL. Use these buttons to set the PADS (22) to one of the 9 available Pad modes (see PADS)
PADS. The 8 touch-sensitive Pads offer different functionality, depending on the selected Pad mode. (see PADS ) The Pads offer touch velocity in all modes (pre-assigned only in the Sampler Velocity mode) and RGB leds.