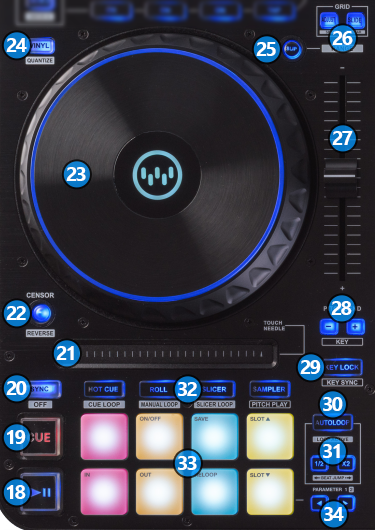
PLAY/PAUSE: Plays / Pauses the track. Press and hold SHIFT and then press this button to "stutter-play" the track from the last set Cue Point.
CUE: When the Deck is paused, you can set a temporary Cue Point by moving the Platter to place the Audio Pointer at the desired location and then pressing the Cue Button. During playback, you can press the Cue Button to return the track to this Cue Point. (If you did not set a Cue Point, then it will return to the beginning of the track.). If the Deck is paused, you can press and hold the Cue Button to play the track from the Temporary Cue Point. Releasing the Cue Button will return the track to the temporary Cue Point and pause it. To continue playback without returning to the Temporary Cue Point, press and hold the Cue Button, then press and hold the Play Button, and then release both buttons. Hold down SHIFT and then press this button to return to the beginning of the track.
SYNC: Press this button to automatically match the corresponding Deck's tempo with the opposite Deck's (or the Master Deck’s if using a 4 decks Skin) tempo and phase. Hold down SHIFT and press this button to manually select this deck as the Master Deck. Hold down SHIFT and hold this button down for 1 sec to resume automatic selection of the Master Deck.
NEEDLE SEARCH STRIP: The length of this strip represents the length of the entire track. Place your finger on a point along this sensor to jump to that point in the track (song position). Important notice: In order to avoid accidental track jumps the needle search does not operate when the deck is on air. If you want to use the strip while a deck is on air please hold down SHIFT first, and then touch the strip.
CENSOR: Press and hold this button to play the track backwards. On release the track will continue from the position it would have been if the button was never pressed. Hold down SHIFT and press this button (momentarily) to play the track backwards. Press again to return to forward direction.
JOGWHEEL: Touch sensitive platter for scratching (Vinyl Mode), bending (CD Mode) or Grid adjusting. The outer blue leds will rotate according to the software jogwheel position, and will blink near the track's end as a warning that the track ends. The logo leds will light with the currently selected deck's color in order to allow a quick visual identification of the current decks layers.
VINYL: Press this button to toggle the jogwheel between the Scratch and Bend modes. Hold down SHIFT and press this button on the left side of the controller to toggle Quantize on/off for all decks. When Quantize is enabled, setting loops, jumping between hot cue points and starting playback of the deck will snap to the grid (CBG) of the track. Hold down SHIFT and press this button on the right side of the controller to switch between the available sideview windows. Hold down SHIFT and hold this button down on the right side of the controller for 1 sec to open/close the sideview window.
SLIP: Enables Slip Mode. Several software functions (such as Jogwheel movements, HotCues and Loops) will apply temporary on the track, and the track will return to the position it would have been if those functions were not triggered. Hold down SHIFT and press this button to cycle through the available pitch ranges.
GRID ADJUST/SLIDE: Adjust: Hold down this button and then move the JOGWHEEL to adjust the width of the CBG of the track (equal to adjusting the BPM of the track). Hold down SHIFT and press this button to set the current track's position as the starting position of the CBG (beat 0) Slide: Hold down this button and then move the JOGWHEEL to shift the position of the CBG of the track. Hold down SHIFT and press this button to reanalyze the track for BPM and thus reset any manual changes you have made.
TEMPO: Controls the track's playback tempo.
PITCH BEND: Press these buttons to temporarily decrease (button -) or increase (button +) the playback tempo of the track. When you release the buttons the playback tempo will reset to the value designated by tempo slider (27) Hold down SHIFT and press these buttons to decrease (button -) or increase (button +) the musical key of the track (tonal shifting)
KEY LOCK: Press this button to "lock" the track's pitch to its current value. The track's tempo will remain at the speed designated by the tempo slider (27). Further adjustments of track's playback speed will not alter the track's key. Hold down SHIFT and press this button once to make the key of the track compatible with key of the other deck (or the master deck if using 4 decks skin). Attention: The key will become compatible with that of the other deck only if a change of +/-1 semitone is required. Hold down SHIFT and press this button again to reset the key back to it's original value (if the key has been altered)
AUTOLOOP: Sets an Automatic loop where it's length equals the current loop length as seen in VirtualDj GUI. You can use the Loop Half/Double (31) buttons to adjust the length of the auto loop. Hold down SHIFT and press this button to reactivate the last used loop.
LOOP HALF/DOUBLE: Halves/Doubles the size of the current active loop, or the predefined loop length used by Autoloop (30). Hold down SHIFT and press these buttons to move the loop 1 beat backwards (button Half) or forward (button Double) if a loop is active. If a loop is not active the track will jump playback position instead.
PAD MODES: Switch the pads of the unit to various modes (see PADS)
PADS: Offer various operations, depending on the PADs Mode (see PADS)
PARAMETERS: Offer various operations, depending on the PADs Mode (see PADS)