


PRIME 4
INPUTS & RECORDING
MICROPHONES
The Denon DJ Prime 4 offers 2 Microphone inputs (connections at the rear panel) and various controls at the top-left panel for both of them. Both Microphone inputs are not part of the USB Audio Interface, and cannot be included in VirtualDJ Audio setup. None of the Mic controls of the device will control mic-related VDJ actions or GUI buttons and vice-versa.
Even though all Mic controls of Prime 4 send Midi messages and could be assigned to any VDJ script action, it is strongly advised not to do so, as the hardware operation will still apply.
RECORD-BROADCAST
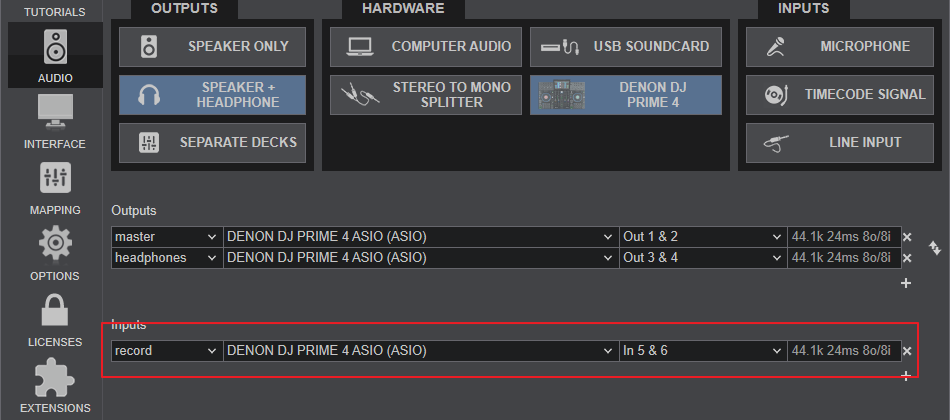
The Denon DJ Prime 4 offers a dedicated Record input and this is part of the default Audio setup. As long as the setup is as per the following image (includes the Record line to Chans 5.6), your mix will be recorded including the signals from the Microphone inputs.
If for some reason you don't want the Microphone inputs to be recorded, or the recorded signal is low, you can remove this line and your mix will still be recorded.
TIMECODE (DVS) - LIVE INPUTS
The USB Audio interface of Prime 4 offers 2 Inputs that can be used for Timecode (DVS) control.
How to:
- Connect your Timecode devices (Turntables with Timecode vinyl or CD player with Timecode CD) to the Inputs named as LINE 3 and LINE 4 at the rear panel of Prime 4. Inputs named as LINE 1 and LINE 2 cannot be used for Timecode inputs. Depending on the type of your Timecode, set the switches to either LN or PH.
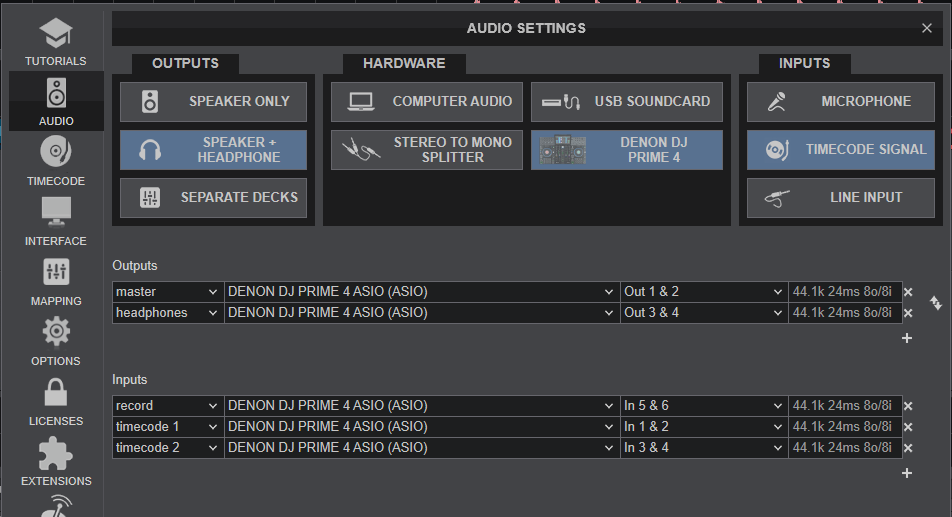
- From VirtualDJ Settings->AUDIO tab, click on the TIMECODE SIGNAL button for VirtualDJ to add 2 timecode lines to Channels 1,2 and 3.4 as per the following image.
- Start your Timecode Devices.
The same Inputs LINE3/4 can be used to route external audio sources to VirtualDJ as Auxiliary inputs (Line Inputs) and route to a VirtualDJ deck to apply Effects etc. In this case, instead of adding the Inputs 1,2 and 3,4 as Timecode, press the LINE INPUT button in Audio Setup and then use the AUX buttons on a Deck.
Important: In both cases, make sure the front Source switchers are set to Engine/USB and not to LN
See further details at VirtualDJ User Manual
STANDALONE MODE
The Denon Prime 4 can operate either in Computer mode (using VirtualDJ or other supported DJ application), or in Standalone mode using the integrated Engine. However there is no back-to-back operation or an easy changeover between the 2 modes, as you will need to "close" one system first, before you "open" the other one.
A smooth transition between the 2 modes can be achieved though. While in Computer mode, you have the ability to connect an auxiliary audio/media source to any of the rear-panel LINE Inputs and set the respective Source switcher at the front panel to LN. Then while this source is playing, you can switch from one mode to the other without notice.
