Reloop - Touch - Touch Display
Effetti
Video Effect and Transition on Master
ELEMENT
DESCRIPTION
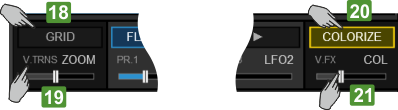
18Displays the selected Video Transition. Tap this button to select a Video Transition (a scroll menu will be offered). The selection can be also made from the [SHIFT]+[VIDEO TRANS ON] button on the left side of the Touch unit. The button will be highlighted when a Video Transition is triggered manually via the [VIDEO TRNS ON] button on the left side of the Touch unit.19Displays a visual indication of the 1st Parameter value (or the 2nd if [SHIFT] is pressed from the Touch unit) of the selected Video Transition. Use this area to adjust the Parameter value, but for more precise adjustments, use the [VIDEO TRNS FADER] from the right side of the Touch unit.20Displays the selected Video Effect on Master Video output. Tap this button to select a Video Effect (a scroll menu will be offered). The selection can be also made from the [SHIFT]+[VIDEO FX ON] button on the right side of the Touch unit. The button will be highlighted when a Video Effect is enabled via the [VIDEO FX ON] button on the right side of the Touch unit..21Displays a visual indication of the 1st Parameter value (or the 2nd if [SHIFT] is pressed from the Touch unit) of the selected Video Effect. Use this area to adjust the Parameter value, but for more precise adjustments, use the [VIDEO FX FADER] from the right side of the Touch unit.Deck Effects
The Effects section of the Touch Display offers indications and controls for the Effects applied on the Left and Right selected decks. Both Left and Right deck Effects offer 2 modes. A Single FX mode with indication and controls for a Single Effect Slot (with more parameters) and a Multi FX mode with indications and controls for 3 FX Slots (with less Parameters but the ability to chain Effects)
The selection between the 2 offered modes can be done via the [SHIFT]+[MODE] buttons of the Touch unit and are deck independent (Left and Right decks can be on different modes)
Single FX mode
 22Displays the selected Effect. Tap this button to select an Effect (a scroll menu will be offered). The selection can be also made from the [FX2 ON] and [FX3 ON] buttons on the Touch unit. The button will be highlighted when the selected Effect is enabled via the [FX1 ON] button on the Touch unit.
When [SHIFT] is pressed from the Touch unit, the button will display the 1st Parameter Button of the selected Effect, which can be controlled via the [SHIFT]+[FX1 ON] button from the Touch unit.23Displays a visual indication of the 1st Parameter value (or the 4th if [SHIFT] is pressed from the Touch unit) of the selected Effect. Tap this area to get the XY Pad Effect view to adjust 2 Parameters at the same time. For more precise adjustments of the 1st/4th Parameters, use the [FX1] / [SHIFT]+[FX1] faders of the Touch unit.24Displays a Left arrow, indicating the action of the [FX2 ON] button (selects the previous available Effect). Tap this button to select an Effect (a scroll menu will be offered). The selection can be also made from the [FX2 ON] and [FX3 ON] buttons on the Touch unit.
When [SHIFT] is pressed from the Touch unit, the button will display the 2nd Parameter Button of the selected Effect, which can be controlled via the [SHIFT]+[FX2 ON] button from the Touch unit..25Displays a visual indication of the 2nd Parameter value (or the 5th if [SHIFT] is pressed from the Touch unit) of the selected Effect. Tap this area to get the XY Pad Effect view to adjust 2 Parameters at the same time. For more precise adjustments of the 2nd /5th Parameter, use the [FX2] / [SHIFT]+[FX2] faders of the Touch unit.26Displays a Right arrow, indicating the action of the [FX3 ON] button (selects the next available Effect). Tap this button to select an Effect (a scroll menu will be offered). The selection can be also made from the [FX2 ON] and [FX3 ON] buttons on the Touch unit.
When [SHIFT] is pressed from the Touch unit, the button will display the 3rd Parameter Button of the selected Effect, which can be controlled via the [SHIFT]+[FX3 ON] button from the Touch unit.27Displays a visual indication of the 3rd Parameter value (or the 6th if [SHIFT] is pressed from the Touch unit) of the selected Effect. Tap this area to get the XY Pad Effect view to adjust 2 Parameters at the same time. For more precise adjustments of the 3rd/6th Parameter, use the [FX3] / [SHIFT]+[FX3] faders of the Touch unit.Multi FX mode
 28Displays the selected Effect for the FX Slot 1. Tap this button to select an Effect for FX Slot 1 (a scroll menu will be offered). The selection can be also made from the [SHIFT]+[FX1 ON] button on the Touch unit. The button will be highlighted when the Effect is enabled via the [FX1 ON] button on the Touch unit..29Displays a visual indication of the 1st Parameter value (or the 2nd if [SHIFT] is pressed from the Touch unit) of the selected Effect of the FX Slot 1. Tap this area to get the XY Pad Effect view to adjust 2 Parameters at the same time. For more precise adjustments of the 1st/2nd Parameters, use the [FX1] / [SHIFT]+[FX1] faders of the Touch unit.30Displays the selected Effect for the FX Slot 2. Tap this button to select an Effect for FX Slot 2 (a scroll menu will be offered). The selection can be also made from the [SHIFT]+[FX2 ON] button on the Touch unit. The button will be highlighted when the Effect is enabled via the [FX2 ON] button on the Touch unit.31Displays a visual indication of the 1st Parameter value (or the 2nd if [SHIFT] is pressed from the Touch unit) of the selected Effect of the FX Slot 2. Tap this area to get the XY Pad Effect view to adjust 2 Parameters at the same time. For more precise adjustments of the 1st/2nd Parameters, use the [FX2] / [SHIFT]+[FX2] faders of the Touch unit..32Displays the selected Effect for the FX Slot 3. Tap this button to select an Effect for FX Slot 3 (a scroll menu will be offered). The selection can be also made from the [SHIFT]+[FX3 ON] button on the Touch unit. The button will be highlighted when the Effect is enabled via the [FX3 ON] button on the Touch unit.33Displays a visual indication of the 1st Parameter value (or the 2nd if [SHIFT] is pressed from the Touch unit) of the selected Effect of the FX Slot 2. Tap this area to get the XY Pad Effect view to adjust 2 Parameters at the same time. For more precise adjustments of the 1st/2nd Parameters, use the [FX3] / [SHIFT]+[FX3] faders of the Touch unit.
XY Pad Effect view
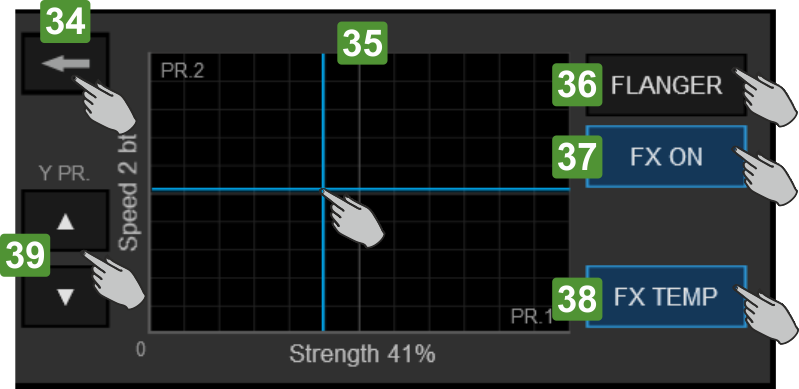
The XY Pad view is offered when the area displaying the Effect Parameters is tapped.
34Tap this button to close the XY Pad Effect view and go back to the default FX view35Offers an X / Y Axis Pad control to simultaneously adjust the Parameters of the selected Effect displayed on the X and Y Axis. By default the 1st Parameter will be displayed on the X Axis and the 2nd Parameter on the Y Axis. Tap and slide inside the Pad control area to adjust the selected Effect Parameters.36Displays the selected Effect. Tap to select a different Effect (a scroll menu will be offered). The selection can be also made via the [FX ON] button on the Touch unit, depending on the selected FX mode.37Tap this button to trigger (toggle or momentary depending on the [FX TEMP] mode) the selected Effect..38Tap this button to enable/disable the FX Temp mode. When enabled, the [FX ON] button will trigger the selected Effect momentary (while tapped) and/or while the XY Axis Pad area is tapped/slided. 39Tap these buttons to select the previous/next available Parameter for the Y Axis. These buttons will not be offered in the view, if the selected Effect has less than 3 Parameters.


